In Chapter 1 you learned what ISF is. In Chapter 2 you traced where GLSL and ISF came from. In Chapter 3 you saw why shaders outlast pre-rendered loops in a live rig. You installed hosts in Chapter 4, learned the ISF Editor in Chapter 5, built a library from isf.video in Chapter 6, and in Chapter 7 you opened the .fs file and understood the JSON + GLSL split. Use the ISF for VJs manual index if you need to jump between modules.
Until Chapter 7, controls appeared as ingredients. This chapter on ISF shader UI controls shows you how to cook them: how to author every input type ISF supports, tune its range for the stage, and leave yourself a rig you can drive entirely from hardware — zero code edits mid-show.
ISF shader UI controls: five JSON input types for live VJs
ISF declares interactive parameters in the JSON INPUTS block—sliders, color pickers, toggles, events, and XY pads—and your host turns each entry into a control you can map to MIDI or OSC. Five input types cover almost every live busking scenario; the sections below walk through each one with JSON, GLSL, and stage-ready naming.
Controls are your instrument
Think of a downloaded shader the way a musician thinks of a synthesizer patch. The patch makes a sound, but the musician performs with the knobs, not with the circuit board. ISF JSON inputs are those knobs. The VJ sets them before the show, maps them to MIDI or OSC, and plays them live while the crowd watches pixels, not code.
The critical insight: every ISF input you declare in JSON becomes a parameter your host software can expose and map to any physical controller. In Resolume that is an Avenue or Arena parameter lane. In VDMX it is a slider or button in a control panel. In Magic Music Visuals it is a value input you can pin to any MIDI CC. The JSON is the spec; the host builds the interface; you perform.
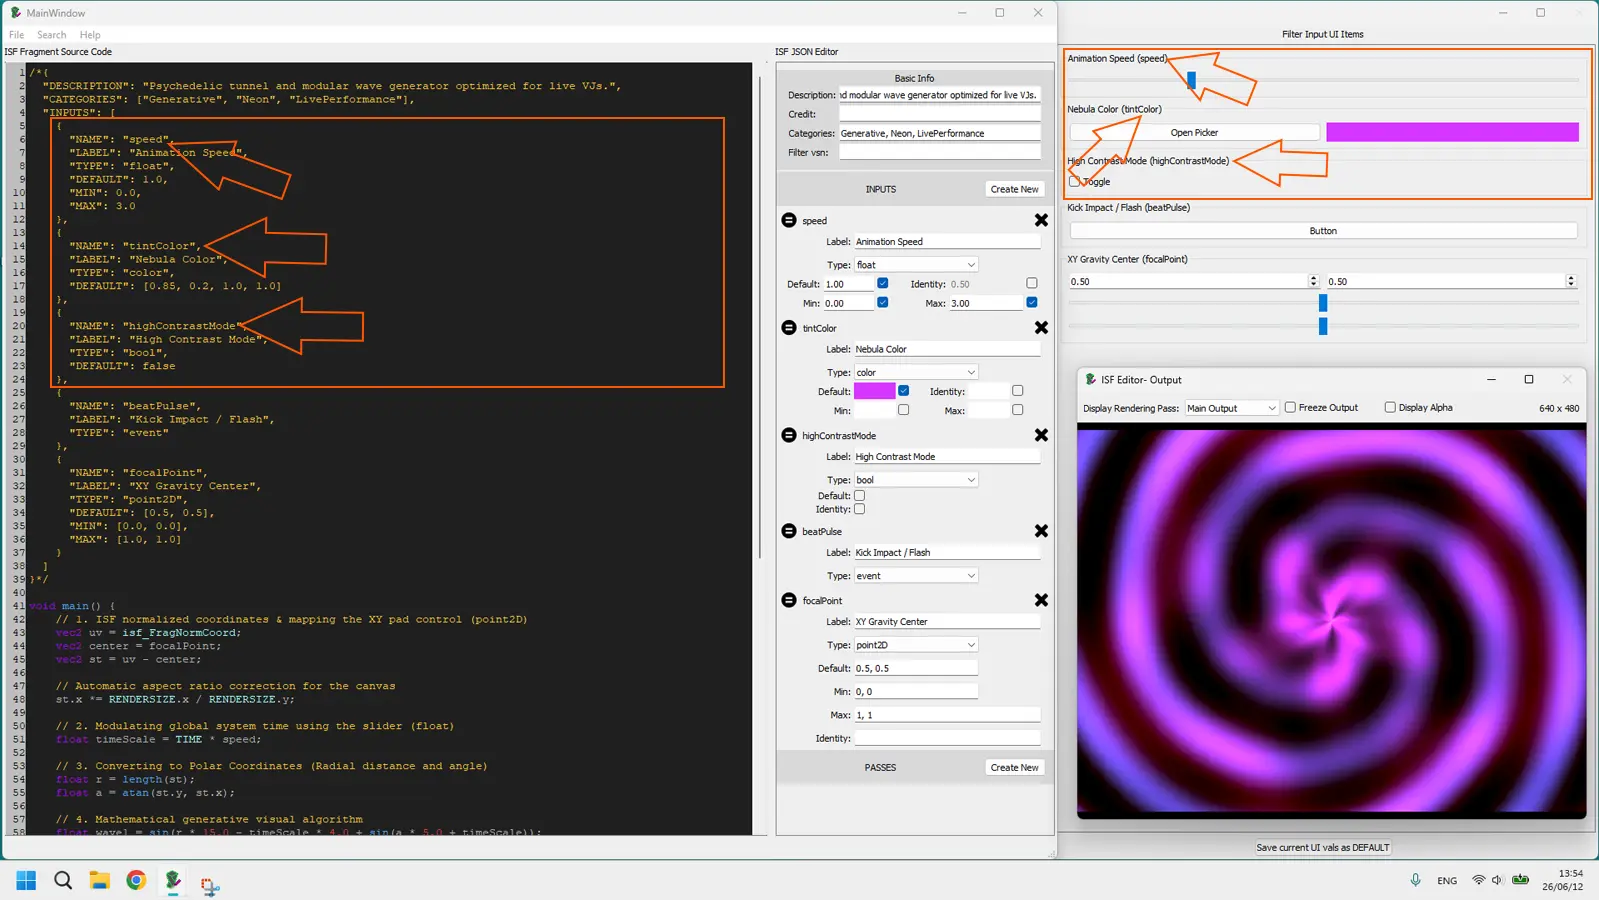
INPUTS block produces different UI elements depending on TYPE: slider for float, color picker for color, toggle for bool.The five input types you will use live
ISF defines several input types. Five of them cover the vast majority of live performance use cases. Learning what each one does in GLSL is the difference between a shader you can perform and one you can only watch.
float: the slider
A float input produces a continuous decimal slider in every ISF-compatible host. It is the most common type in any shader library — speed, intensity, zoom, density, blur amount, and anything else that lives on a spectrum.
/*{
  "INPUTS": [
    {
      "NAME": "speed",
      "TYPE": "float",
      "DEFAULT": 1.0,
      "MIN": 0.0,
      "MAX": 3.0
    }
  ]
}*/
In GLSL, speed arrives as a plain decimal number you can use anywhere a number is expected:
float timeScale = TIME * speed;Performance tip: set MIN to 0.0 on any speed control. A slider that bottoms out at zero gives you a hard freeze — the current frame holds. That is a deliberately expressive move mid-set, not a bug.

float JSON input becomes a draggable slider in the host and a plain decimal variable in GLSL — the same value, two interfaces.color: the color picker
A color input opens a full RGBA color picker in the host. It is the fastest way to let a VJ swap palette on stage without touching a single number in GLSL.
/*{
  "INPUTS": [
    {
      "NAME": "tintColor",
      "TYPE": "color",
      "DEFAULT": [0.85, 0.2, 1.0, 1.0]
    }
  ]
}*/
The DEFAULT value is an RGBA array where each channel runs from 0.0 to 1.0. In GLSL, a color input arrives as a vec4 with channels .r, .g, .b, and .a:
vec3 baseColor = tintColor.rgb;You do not declare tintColor as a uniform in GLSL — ISF injects it automatically from the JSON block, just like float. Multiply your existing luminance or pattern value by tintColor.rgb and the host color picker drives the palette in real time.
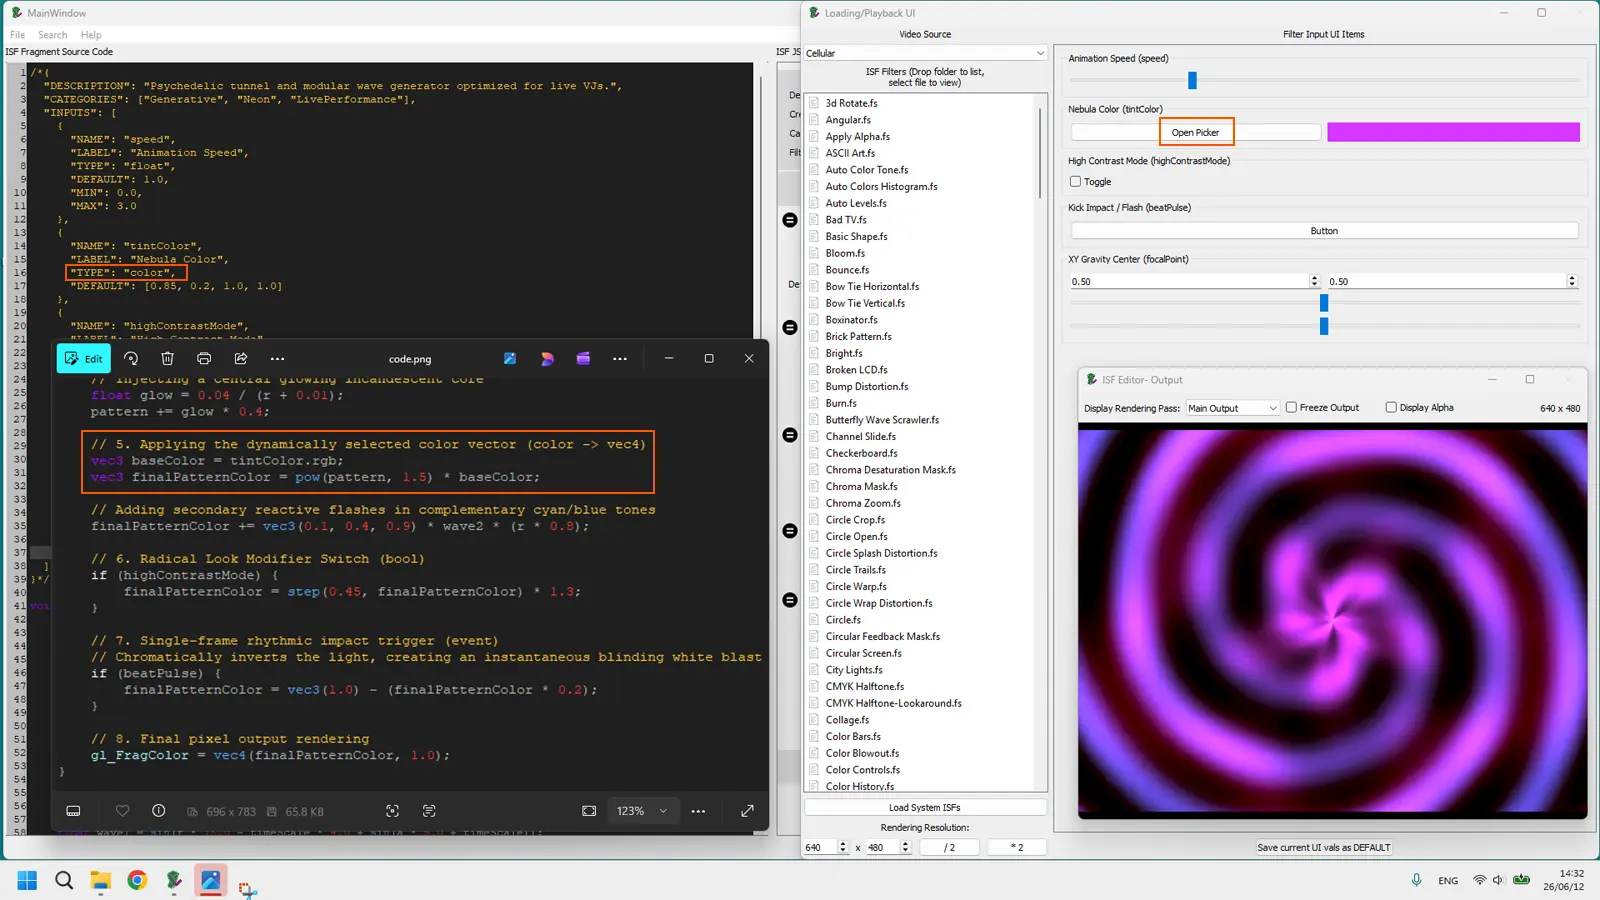
color input arrives in GLSL as a vec4. Use .rgb to tint, .a for opacity, or all four channels for full palette math.bool: the toggle
A bool input is a single on/off button. In a live set it is perfect for flipping modes: invert the image, switch from warm to cold palette, enable or disable a secondary effect layer.
/*{
  "INPUTS": [
    {
      "NAME": "highContrastMode",
      "TYPE": "bool",
      "DEFAULT": false
    }
  ]
}*/
In GLSL, highContrastMode is a bool. Use it directly in an if statement or in the ternary operator:
if (highContrastMode) {
    finalPatternColor = step(0.45, finalPatternColor) * 1.3;
}
One button, two completely different images. Mapped to a MIDI pad, you can hit it on the snare and the whole visual inverts for one bar. No code, no editor, just the pad.
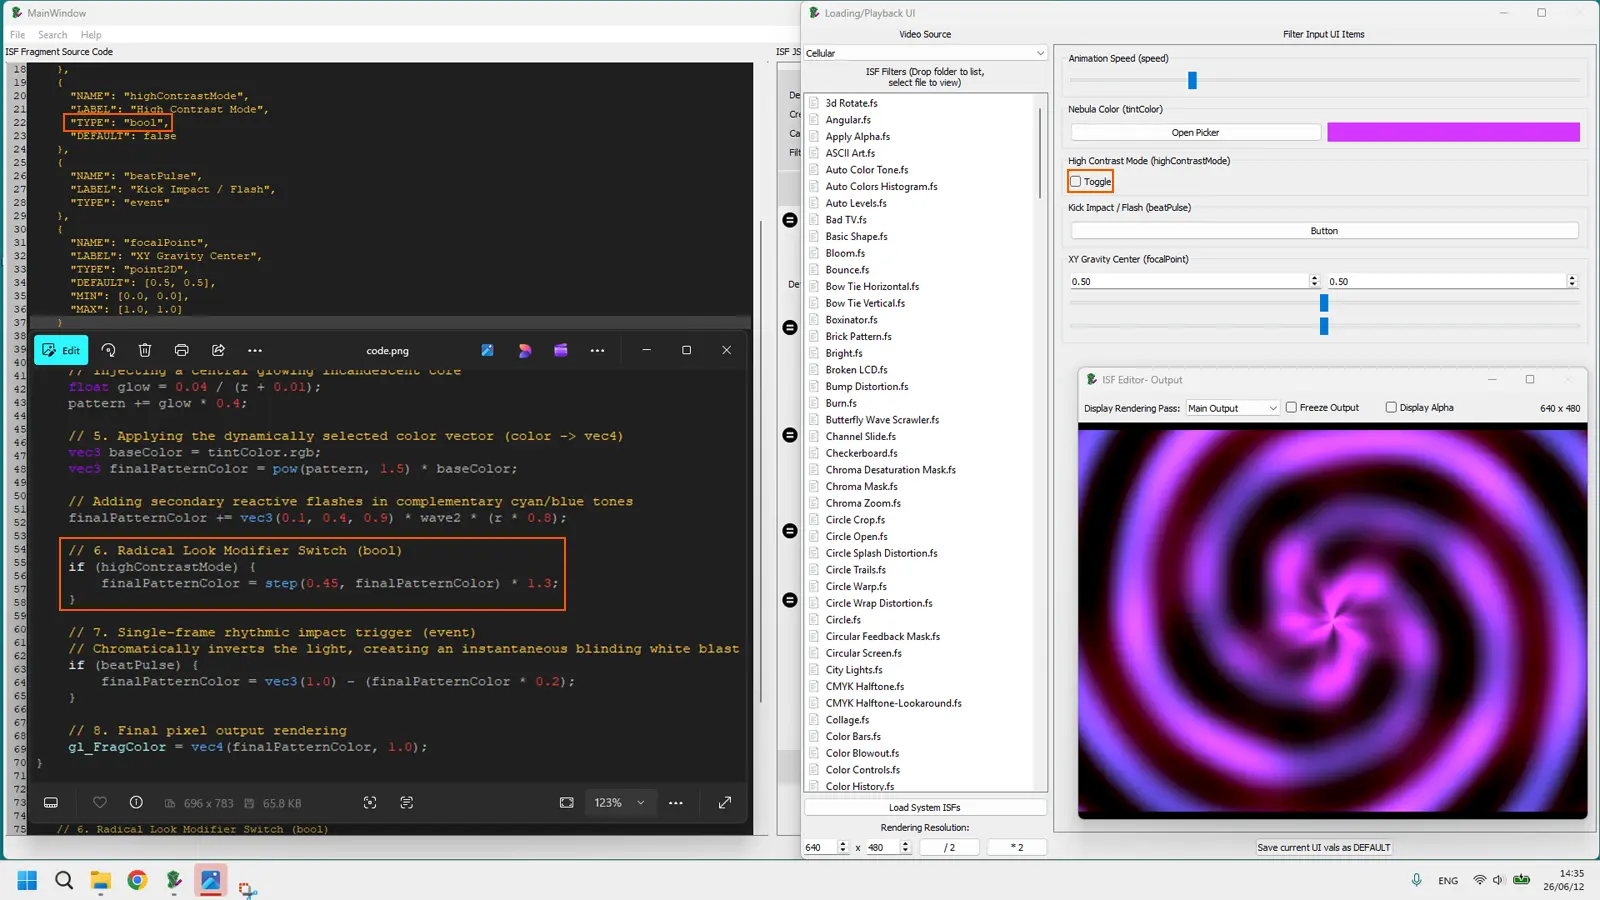
bool toggle maps perfectly to a MIDI pad or keyboard key. One press flips the GLSL conditional and the visual state changes instantly.event: the one-frame pulse
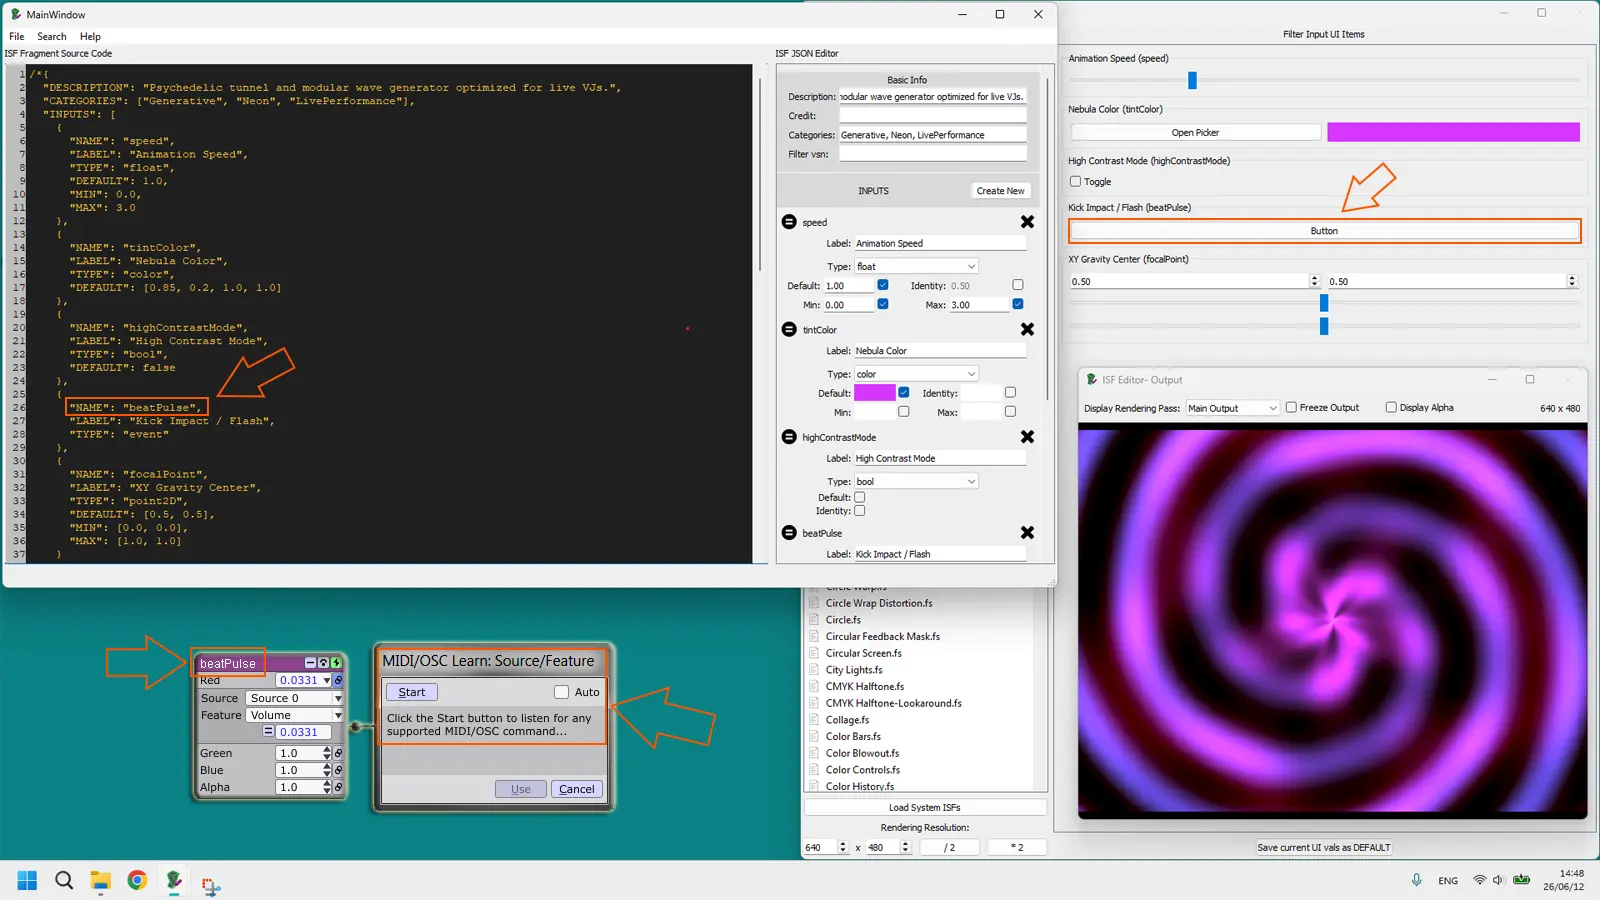
An event input is true for exactly one rendered frame when triggered, then automatically resets to false. It does not hold a value — it fires and disappears. Think of it as a camera shutter: one frame of reaction, then back to normal.
/*{
  "INPUTS": [
    {
      "NAME": "beatPulse",
      "TYPE": "event"
    }
  ]
}*/
In GLSL, beatPulse is a bool that is only ever true on that single frame. A common use is to capture that trigger and use it to seed an accumulation or reset an animation cycle:
if (beatPulse) {
    finalPatternColor = vec3(1.0) - (finalPatternColor * 0.2);
}
Mapped to a MIDI note on a kick drum, this produces a single-frame white flash on every beat hit — no envelope, no sustain, just impact. In hosts that support audio analysis, the event can also be wired to a beat-detection output.
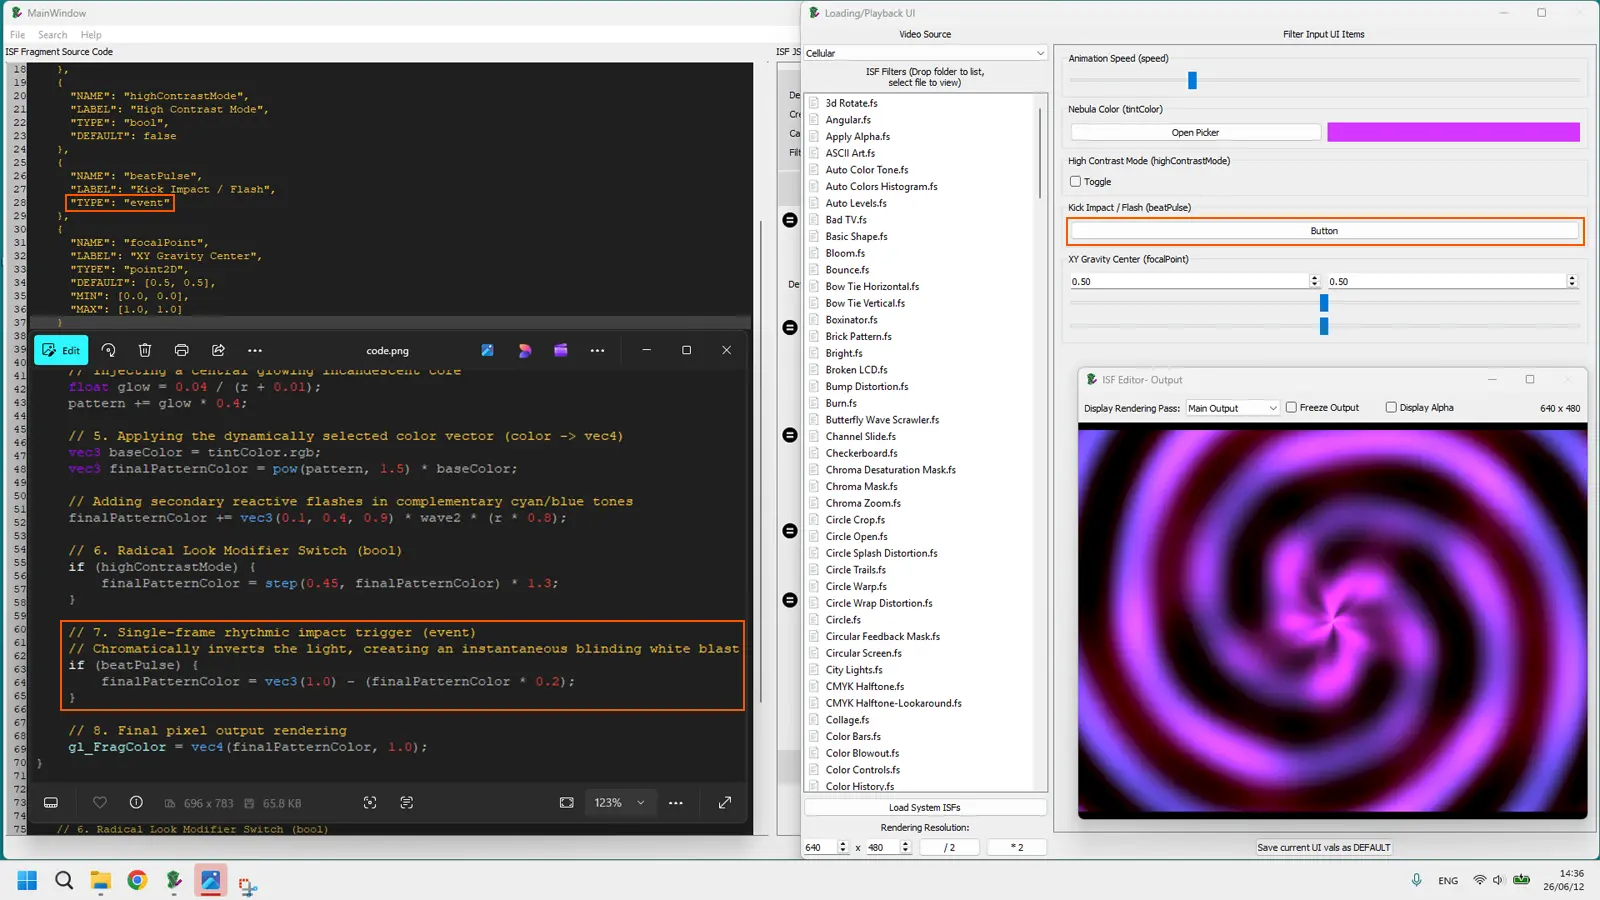
event fires for exactly one frame. Wired to a MIDI kick or a beat-detection output, it produces hard visual hits that lock to the music.point2D: the XY envelope
A point2D input exposes two coordinates — X and Y — as a single draggable point on a 2D pad in the host. It is the visual equivalent of an XY envelope on a synthesizer: one gesture moves two parameters simultaneously.
/*{
  "INPUTS": [
    {
      "NAME": "focalPoint",
      "TYPE": "point2D",
      "DEFAULT": [0.5, 0.5],
      "MIN": [0.0, 0.0],
      "MAX": [1.0, 1.0]
    }
  ]
}*/
In GLSL, focalPoint arrives as a vec2. Use it wherever you need a position: the center of a radial pattern, the origin of a zoom, the anchor of a distortion:
vec2 center = focalPoint;
vec2 st = uv - center;
On stage, dragging the XY pad shifts the focal point of the entire pattern across the screen. Mapped to a joystick or touchpad on a MIDI controller, it becomes one of the most expressive single gestures in a VJ's toolkit.
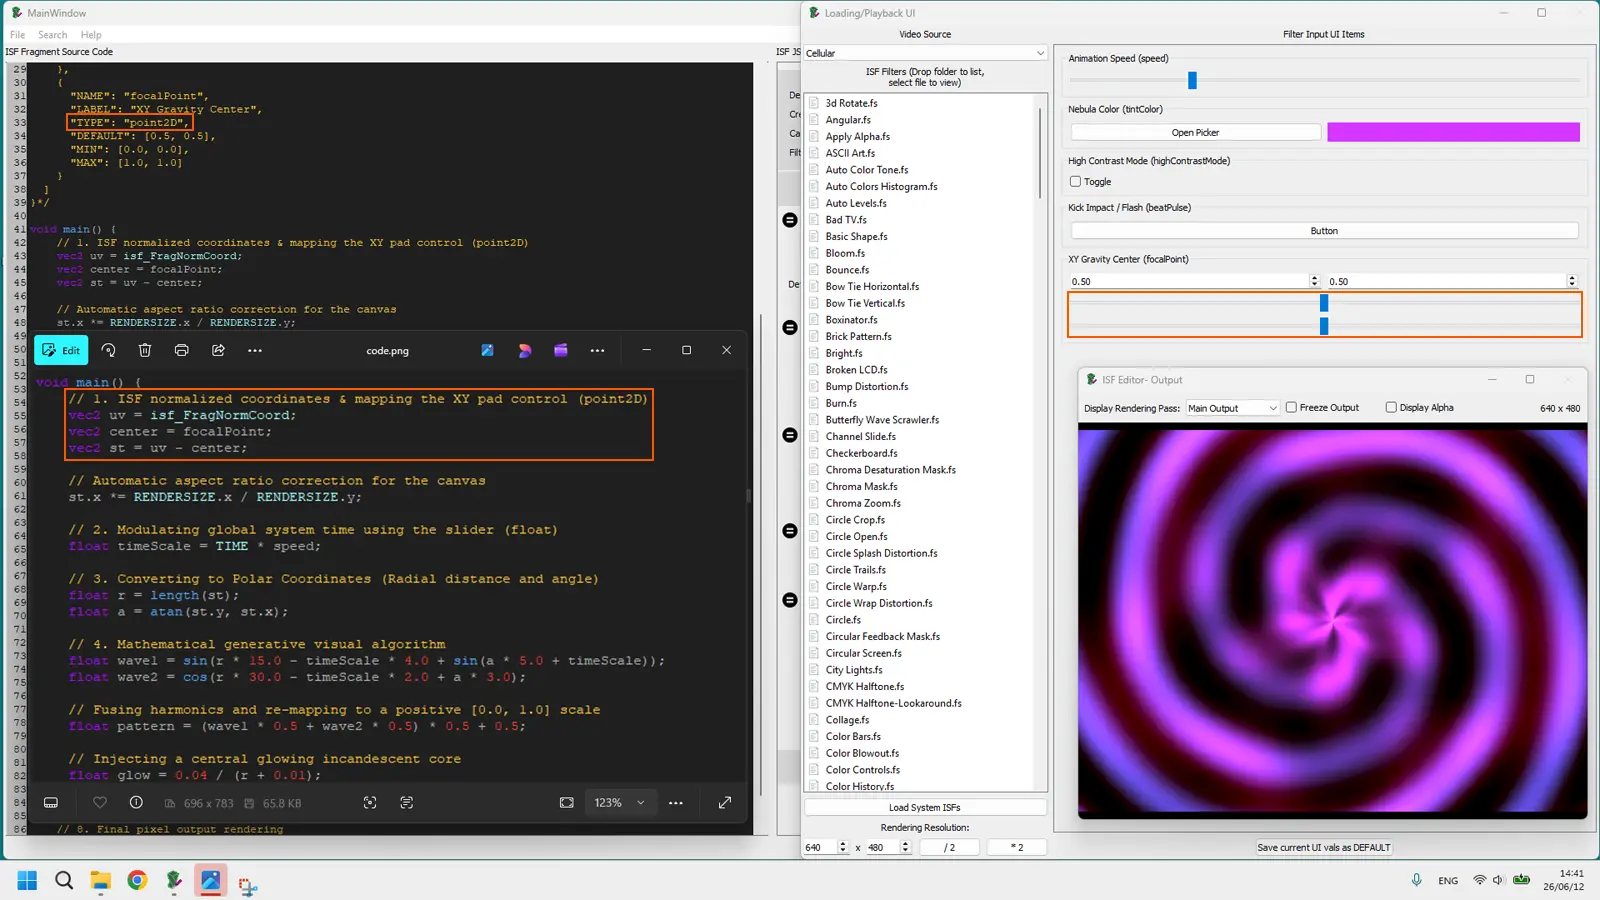
point2D pad moves two GLSL values at once. Drag it across the screen space to reposition the center of any radial, zoom, or distortion pattern.Designing controls for live performance
Writing the JSON is the easy part. Designing controls you can actually busk — in low light, under pressure, while watching a projection surface — is a separate skill. Here are the three rules that change everything.
Name your controls for the stage, not the code
The NAME field appears as the label in your host's control panel. A shader that exposes u_k1_multiplier is unplayable at 2 AM. A shader that exposes speed, brightness, and invert is not.
Rules for performable names: use plain English words, keep them under twelve characters, avoid abbreviations that are not obvious to you under pressure. speed, zoom, blur, tint, pulse, invert — these are names you can read at a glance and map without thinking.
Remember that NAME must also be a valid GLSL identifier: no spaces, no hyphens, no leading numbers. Underscores are fine: base_color, ring_count.
Set MIN and MAX for your actual show range
Many shaders downloaded from editor.isf.video expose MIN: 0.0 and MAX: 100.0 because the author was testing math, not performing. The result is a slider where 95% of the travel does nothing interesting, and the useful zone is a two-pixel band in the middle.
Before adding a shader to your live set, open the .fs file in the ISF Desktop Editor, find each float input, and tighten MIN and MAX to the range that actually looks good. If speed between 0.5 and 2.5 covers everything you want, write that. The full slider travel now maps to a genuinely expressive range.
MIDI and OSC mapping without touching GLSL
Every ISF input you declare is immediately available for mapping in any compatible host — no GLSL edit required. The workflow is always the same:
- Load the shader into your host (Resolume, VDMX, Magic Visuals, or similar).
- Find the parameter in the host's control panel. The label matches the JSON
NAMEyou wrote. - Right-click or enable MIDI learn mode in your host.
- Move the physical knob, fader, or pad you want to map.
- The parameter is now live-controlled from hardware.
From that point on, the GLSL never opens again. You perform entirely through hardware. That is the contract ISF makes with the VJ: write good JSON once, perform with your hands forever.
Build the Chapter 8 shader step by step
We will build the complete "Cosmic Cyber Pulse" shader from the interactive demo. It explicitly implements all 5 core input types — float, color, bool, event, and point2D — so you can see exactly how they declare in JSON and read within the GLSL routine. Open ISF Desktop Editor and follow along.
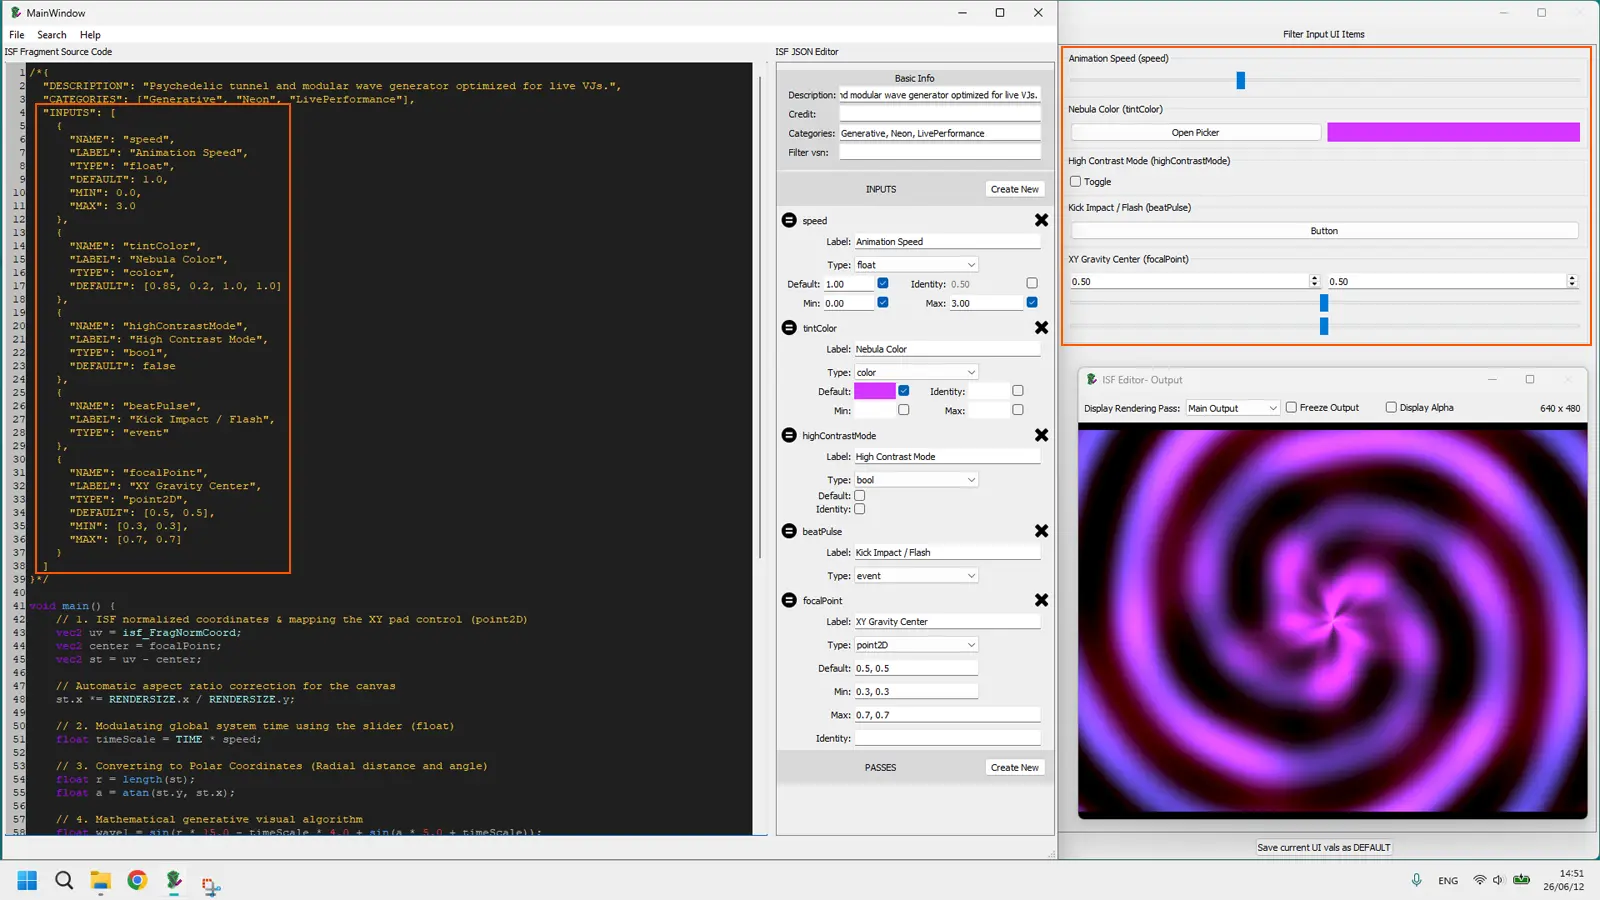
Step 1: JSON — five controls
/*{
  "DESCRIPTION": "Psychedelic tunnel and modular wave generator optimized for live VJs.",
  "CATEGORIES": ["Generative", "Neon", "LivePerformance"],
  "INPUTS": [
    {
      "NAME": "speed",
      "TYPE": "float",
      "DEFAULT": 1.0,
      "MIN": 0.0,
      "MAX": 3.0
    },
    {
      "NAME": "tintColor",
      "TYPE": "color",
      "DEFAULT": [0.85, 0.2, 1.0, 1.0]
    },
    {
      "NAME": "highContrastMode",
      "TYPE": "bool",
      "DEFAULT": false
    },
    {
      "NAME": "beatPulse",
      "TYPE": "event"
    },
    {
      "NAME": "focalPoint",
      "TYPE": "point2D",
      "DEFAULT": [0.5, 0.5],
      "MIN": [0.0, 0.0],
      "MAX": [1.0, 1.0]
    }
  ]
}*/
Five inputs covering five structural roles. speed scales time, tintColor handles color vectors, highContrastMode applies structural conditionals, beatPulse captures momentary actions, and focalPoint remaps the structural center coordinate.
Step 2: GLSL body
void main() {
    vec2 uv = isf_FragNormCoord;
    vec2 center = focalPoint;
    vec2 st = uv - center;
    st.x *= RENDERSIZE.x / RENDERSIZE.y;
    float timeScale = TIME * speed;
    float r = length(st);
    float a = atan(st.y, st.x);
    float wave1 = sin(r * 15.0 - timeScale * 4.0 + sin(a * 5.0 + timeScale));
    float wave2 = cos(r * 30.0 - timeScale * 2.0 + a * 3.0);
    float pattern = (wave1 * 0.5 + wave2 * 0.5) * 0.5 + 0.5;
    float glow = 0.04 / (r + 0.01);
    pattern += glow * 0.4;
    vec3 baseColor = tintColor.rgb;
    vec3 finalPatternColor = pow(pattern, 1.5) * baseColor;
    finalPatternColor += vec3(0.1, 0.4, 0.9) * wave2 * (r * 0.8);
    if (highContrastMode) {
        finalPatternColor = step(0.45, finalPatternColor) * 1.3;
    }
    if (beatPulse) {
        finalPatternColor = vec3(1.0) - (finalPatternColor * 0.2);
    }
    gl_FragColor = vec4(finalPatternColor, 1.0);
}
Step 3: complete .fs file (copy into ISF Editor)
/*{
  "DESCRIPTION": "Psychedelic tunnel and modular wave generator optimized for live VJs.",
  "CATEGORIES": ["Generative", "Neon", "LivePerformance"],
  "INPUTS": [
    {
      "NAME": "speed",
      "TYPE": "float",
      "DEFAULT": 1.0,
      "MIN": 0.0,
      "MAX": 3.0
    },
    {
      "NAME": "tintColor",
      "TYPE": "color",
      "DEFAULT": [0.85, 0.2, 1.0, 1.0]
    },
    {
      "NAME": "highContrastMode",
      "TYPE": "bool",
      "DEFAULT": false
    },
    {
      "NAME": "beatPulse",
      "TYPE": "event"
    },
    {
      "NAME": "focalPoint",
      "TYPE": "point2D",
      "DEFAULT": [0.5, 0.5],
      "MIN": [0.0, 0.0],
      "MAX": [1.0, 1.0]
    }
  ]
}*/

void main() {
    vec2 uv = isf_FragNormCoord;
    vec2 center = focalPoint;
    vec2 st = uv - center;
    st.x *= RENDERSIZE.x / RENDERSIZE.y;
    float timeScale = TIME * speed;
    float r = length(st);
    float a = atan(st.y, st.x);
    float wave1 = sin(r * 15.0 - timeScale * 4.0 + sin(a * 5.0 + timeScale));
    float wave2 = cos(r * 30.0 - timeScale * 2.0 + a * 3.0);
    float pattern = (wave1 * 0.5 + wave2 * 0.5) * 0.5 + 0.5;
    float glow = 0.04 / (r + 0.01);
    pattern += glow * 0.4;
    vec3 baseColor = tintColor.rgb;
    vec3 finalPatternColor = pow(pattern, 1.5) * baseColor;
    finalPatternColor += vec3(0.1, 0.4, 0.9) * wave2 * (r * 0.8);
    if (highContrastMode) {
        finalPatternColor = step(0.45, finalPatternColor) * 1.3;
    }
    if (beatPulse) {
        finalPatternColor = vec3(1.0) - (finalPatternColor * 0.2);
    }
    gl_FragColor = vec4(finalPatternColor, 1.0);
}
Line-by-line breakdown
vec2 uv = isf_FragNormCoord; — fetches the normalized coordinates from the canvas, mapping the entire viewport space onto a clean 0.0..1.0 boundary scale.
vec2 center = focalPoint; — links the processing center directly to our 2D vector pad control. This makes the tunnel origin dynamic instead of locked to a fixed constant.
vec2 st = uv - center; — recenters coordinates to the local center of gravity. This sets up an absolute origin point for all polar transformations.
st.x *= RENDERSIZE.x / RENDERSIZE.y; — automatic aspect ratio correction for the canvas. It protects circular features from flattening or warping into stretching ovals on wide displays.
float timeScale = TIME * speed; — time scaled by the speed slider. At speed = 0 the tunnel freezes. Higher values accelerate the inward pull.
float r = length(st); — radial distance from the center. This is what creates the circular concentric rings of the tunnel structure.
float a = atan(st.y, st.x); — the angle of each pixel around the center, in radians. Adding this to the formula introduces spiral and rotation into the tunnel pattern.
float wave1 = sin(r * 15.0 - timeScale * 4.0 + sin(a * 5.0 + timeScale)); — the first harmonic wave layer. Combining the distance factor with a sin-warped angular vector makes the geometric boundaries morph organically over time.
float wave2 = cos(r * 30.0 - timeScale * 2.0 + a * 3.0); — the secondary higher-frequency wave pattern. It layers denser spatial interference to fracture the smooth edges of the first wave module.
float pattern = (wave1 * 0.5 + wave2 * 0.5) * 0.5 + 0.5; — mixes both harmonic waves evenly and maps their collective bipolar range into a positive 0.0..1.0 brightness scale.
float glow = 0.04 / (r + 0.01); — generates an inverse mathematical curve to produce a central glowing incandescent core. Adding 0.01 prevents an illegal division by zero at the exact center.
vec3 baseColor = tintColor.rgb; — extracts the pure RGB color data from the 4-channel RGBA uniform injected by the host color picker input.
vec3 finalPatternColor = pow(pattern, 1.5) * baseColor; — multiplies the grey pattern value by the vector colors provided by the tintColor picker. The pow exponent deepens the shadow boundaries.
finalPatternColor += vec3(0.1, 0.4, 0.9) * wave2 * (r * 0.8); — injects a constant secondary cyan chromatic overlay scaled by radial distance, ensuring rich multi-tonal structures even when the main tint changes.
if (highContrastMode) { finalPatternColor = step(0.45, finalPatternColor) * 1.3; } — the conditional threshold logic. When active, it discards smooth anti-aliased steps and clamps values into raw vectorized neon graphics.
if (beatPulse) { finalPatternColor = vec3(1.0) - (finalPatternColor * 0.2); } — transient strobe trigger handler. On the frame this event evaluates to true, it introduces an instantaneous blinding color inversion.
gl_FragColor = vec4(finalPatternColor, 1.0); — writes the final pixel color with full opacity.
Guided experiments
Open the shader in ISF Desktop Editor. Change one value, save with Cmd/Ctrl+S, and watch the output update. If something breaks, undo and retry. These edits are entirely in JSON — no GLSL knowledge required.
Experiment 1: push the color picker into monochrome
Change the DEFAULT of tintColor to equal values on all three channels:
"DEFAULT": [0.9, 0.9, 0.9, 1.0]The tint becomes neutral white — the pattern shows as pure luminance with no color cast. Drag the color picker to a deep blue [0.1, 0.2, 1.0, 1.0] to pivot to a cold club palette. Notice how the same GLSL code produces a completely different aesthetic from one JSON edit.
Experiment 2: wire the toggle to a second palette
The current toggle inverts the image. A more nuanced version uses the bool to switch between two tint colors instead of inverting. In the GLSL body, replace the highContrastMode block line with:
if (highContrastMode) {
    finalPatternColor.rgb = finalPatternColor.gbr * vec3(0.2, 1.5, 0.8);
}
The toggle now flips between a warm magenta palette and a hyper-saturated neon green and cyan matrix. The controls tell the story on stage: one button, two moods, instant palette switch.
Experiment 3: tighten the speed range for busking
The current MAX: 3.0 makes the tunnel very fast at the top of the slider. For a more musical range, bring it down:
{
  "NAME": "speed",
  "TYPE": "float",
  "DEFAULT": 0.5,
  "MIN": 0.0,
  "MAX": 1.5
}
Now the full slider travel covers the useful range: zero freeze at the bottom, a fast but not frantic tunnel at the top. The middle of the slider — where your hand naturally rests — lands at a tempo that works for most BPMs. This is control design for the human body, not for the GPU.
Experiment 4: override the one-frame flash behavior
The event type currently creates an inversion strobe. Let's redirect that transient flag to instantly break the pattern logic instead of shifting color channels. Modify the beatPulse conditional block to execute a geometric collapse:
if (beatPulse) {
    finalPatternColor.rgb += vec3(glow * 8.0);
}
When you click the trigger button now, the shader will fire an intense, organic exposure burst emanating purely from the center of the tunnel grid instead of a uniform screen flash.
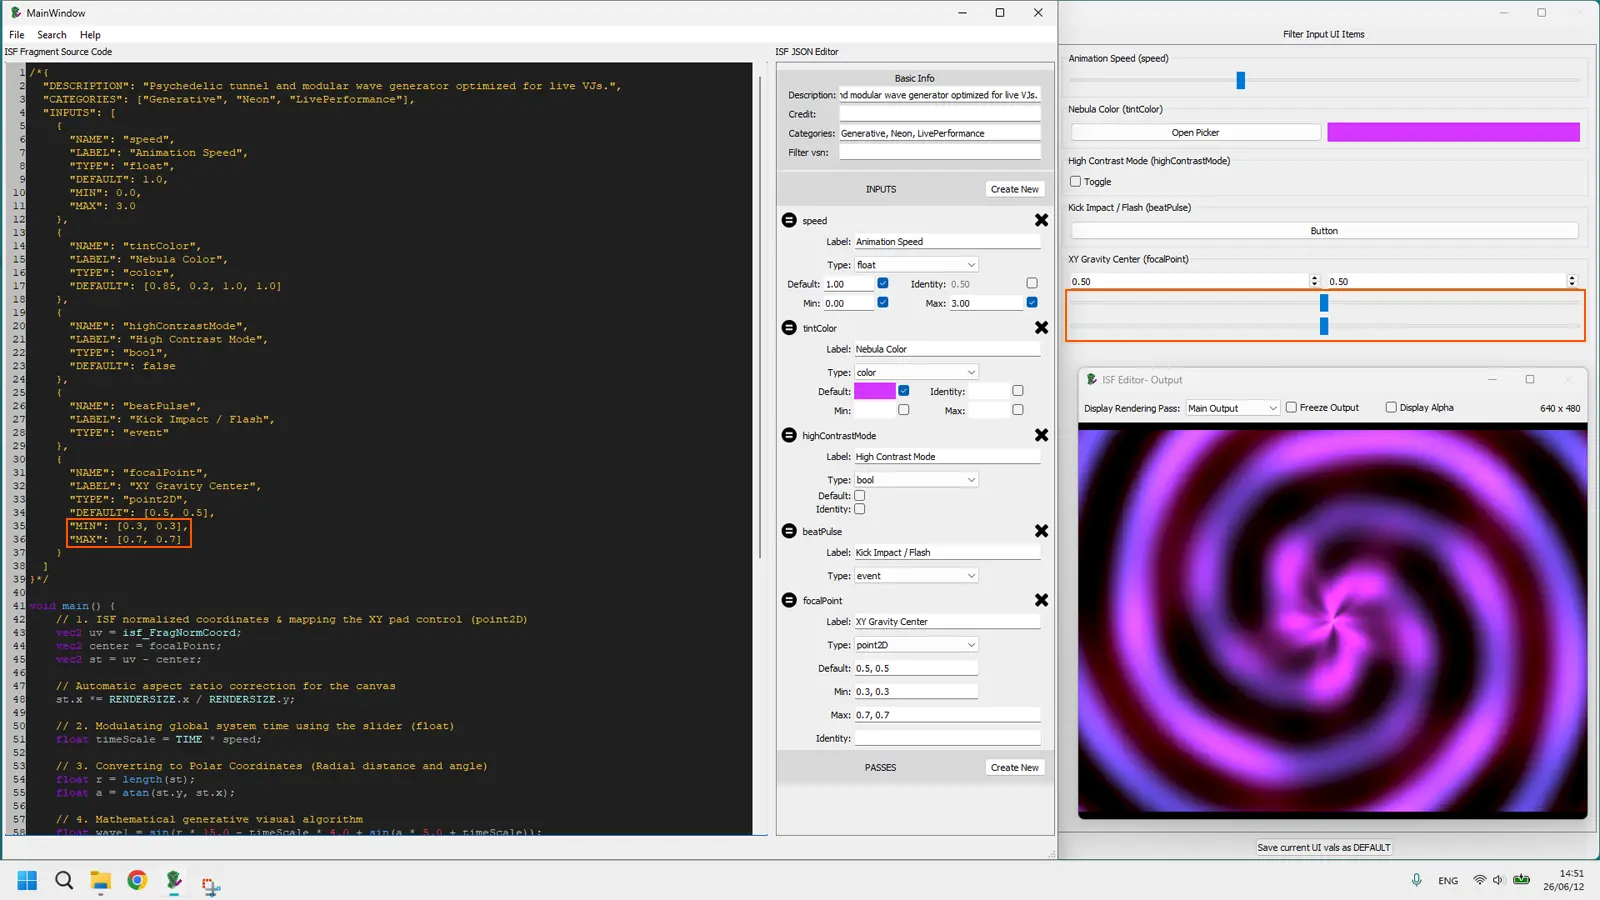
Experiment 5: constrain the focal point gravitational envelope
By default, focalPoint can drift across the entire screen boundaries (0.0 to 1.0). If you drag the pad to the extreme edges during a show, the tunnel pattern completely disappears from sight, leaving a black viewport. Let's clip its limits directly inside the JSON array:
{
  "NAME": "focalPoint",
  "TYPE": "point2D",
  "DEFAULT": [0.5, 0.5],
  "MIN": [0.3, 0.3],
  "MAX": [0.7, 0.7]
}
Save the changes. Drag the host software crosshair as far as you can: the tunnel center remains securely locked within a tightly controlled inner quadrant, protecting your composition from unintended canvas dropouts mid-performance.
Quick reference table: all ISF input types
| JSON TYPE | Host control | GLSL type | Live use |
|---|---|---|---|
float |
Continuous slider | float |
Speed, intensity, zoom, density |
color |
RGBA color picker | vec4 |
Palette, tint, background color |
bool |
Toggle button | bool |
Invert, mode switch, effect on/off |
int |
Discrete selector / stepper | int |
Mode index, segment count, pattern variant |
event |
Momentary trigger button | bool (one frame) |
Flash, reset, beat hit, one-shot transition |
point2D |
XY pad | vec2 |
Focal point, distortion origin, zoom center |
image |
Texture slot | sampler2D |
Video input, logo overlay, texture source |
audio |
Audio waveform buffer | sampler2D |
Audio-reactive waveform sampling |
audioFFT |
FFT spectrum buffer | sampler2D |
Frequency-band reactive visuals |
Live shader preview on this page
Speed · TINTCOLOR · High Contrast Mode · Beat Pulse · Focal Point X/Y
The demo above runs the plasma tunnel from this chapter with the same five controls you would use in a real host. Speed at zero freezes the frame — a deliberate performance tool. Use the TINTCOLOR picker to shift the palette without touching GLSL. Toggle High Contrast Mode to flip the image on a peak moment. Click Beat Pulse for a one-frame beat hit. Drag Focal Point X and Y to reposition the tunnel center. Under the hood, every control move updates a GLSL uniform; the GPU repaints the frame within milliseconds.
Use editor.isf.video to test edits in the browser, ISF Desktop Editor for local iteration, and the ISF documentation for the full specification of every input type.
Frequently Asked Questions
What comes next
You now know how to author every ISF input type, tune ranges for live performance, and map parameters to MIDI or OSC without touching GLSL mid-show. The next chapter — GLSL Data Types for VJs — Chapter 9 — goes one layer deeper: what float, bool, vec2, vec3, and vec4 actually mean inside the shader code, in plain English. Understanding those types is what stops uniform-mismatch compile errors when you tweak a downloaded shader or copy a snippet from a forum.
Technical Appendix
This appendix centralizes quick references for this chapter, including cited links and chapter navigation for faster study and review.
Referenced Links
- Chapter 1
- Chapter 2
- Chapter 3
- Chapter 4
- Chapter 5
- isf.video in Chapter 6
- Chapter 7
- ISF for VJs manual index
- Resolume
- VDMX
- Magic Music Visuals
- editor.isf.video
- ISF Desktop Editor
- ISF documentation