In Chapter 1 you learned what ISF is. In Chapter 7 you opened the .fs file and saw the JSON + GLSL split. In Chapter 8 you learned to author sliders, color pickers, toggles, events, and XY pads. In Chapter 9 you learned what float, bool, vec2, vec3, and vec4 actually mean, so type errors stopped being scary. Use the ISF for VJs manual index if you need to jump between modules.
Now it is time to put all of that to work. This chapter on modify ISF shader code is about confidently opening a shader you downloaded from the ISF library, finding the exact line that controls something you want to change, editing it without programming experience, and — just as importantly — knowing how to undo it in thirty seconds if your tweak ruins the look mid-set.
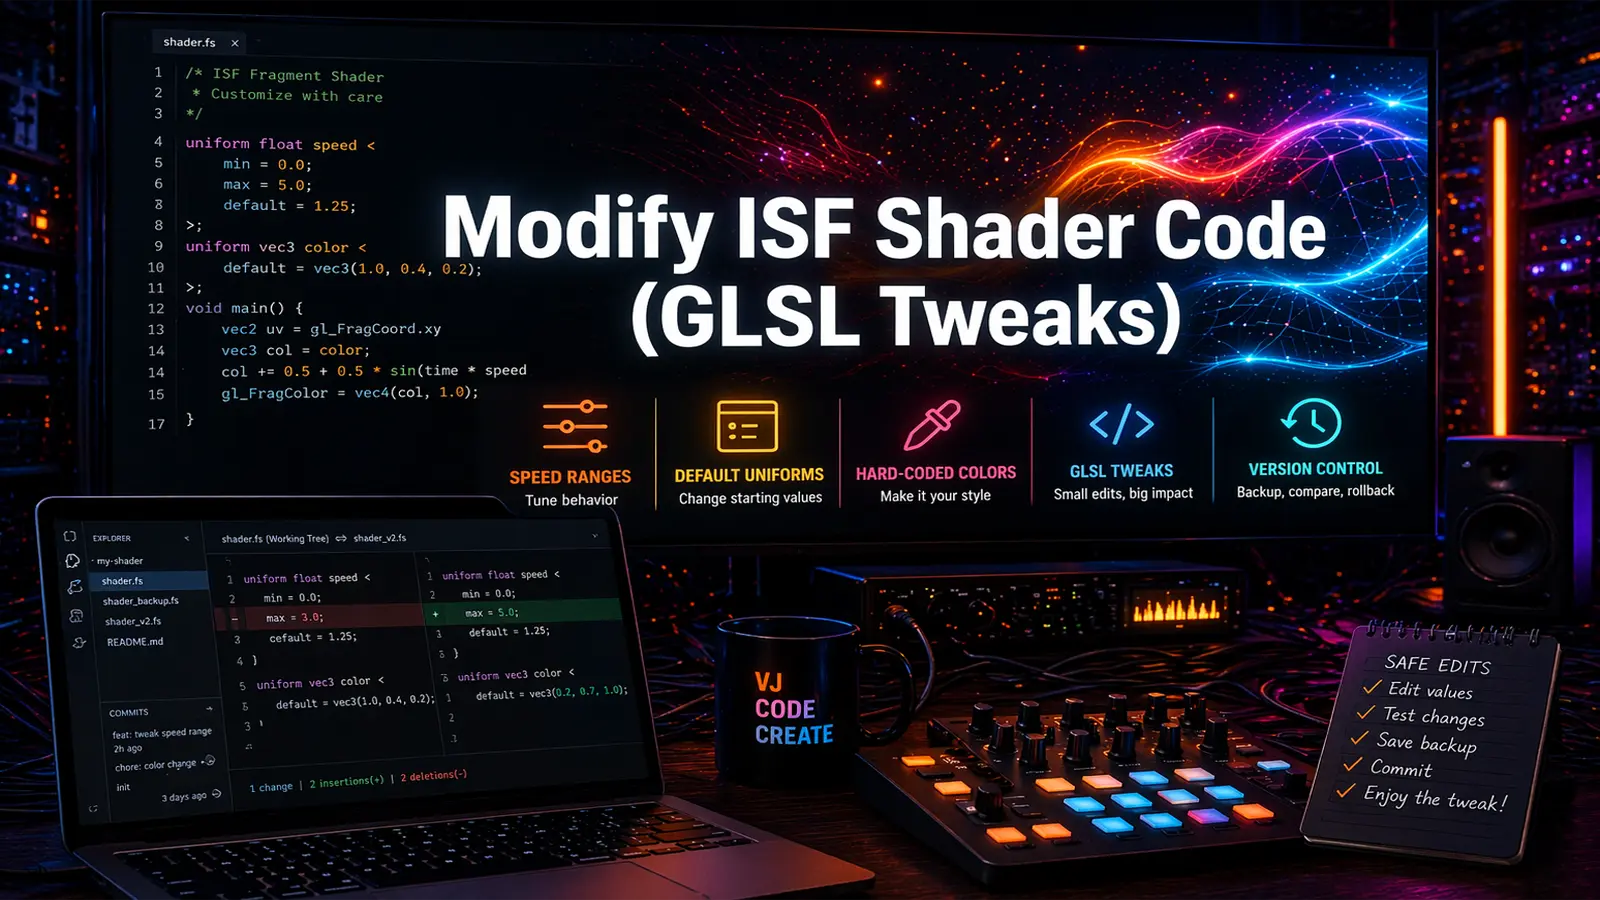
Modify ISF shader code: safe GLSL tweaks for VJs
Every VJ who has built a real shader library hits the same wall eventually. You download a beautiful generative pattern from editor.isf.video or the community archive, load it into ISF Editor, and it is 90% perfect. The motion is great. The shapes are exactly your style. But the speed range tops out way too fast for your set, the default color is a shade of teal that clashes with your stage lighting, or there is a bright magenta baked straight into the pattern that you simply cannot stand.
The instinct most non-programmers have at this point is to give up and either use the shader as-is, or abandon it entirely and keep scrolling for something "good enough" out of the box. Neither is necessary. You do not need to know how to program to modify a shader. You need to know how to read a small, predictable pattern of text, change the right characters, and verify nothing else broke. That is a skill, not a programming language, and this chapter teaches it directly.
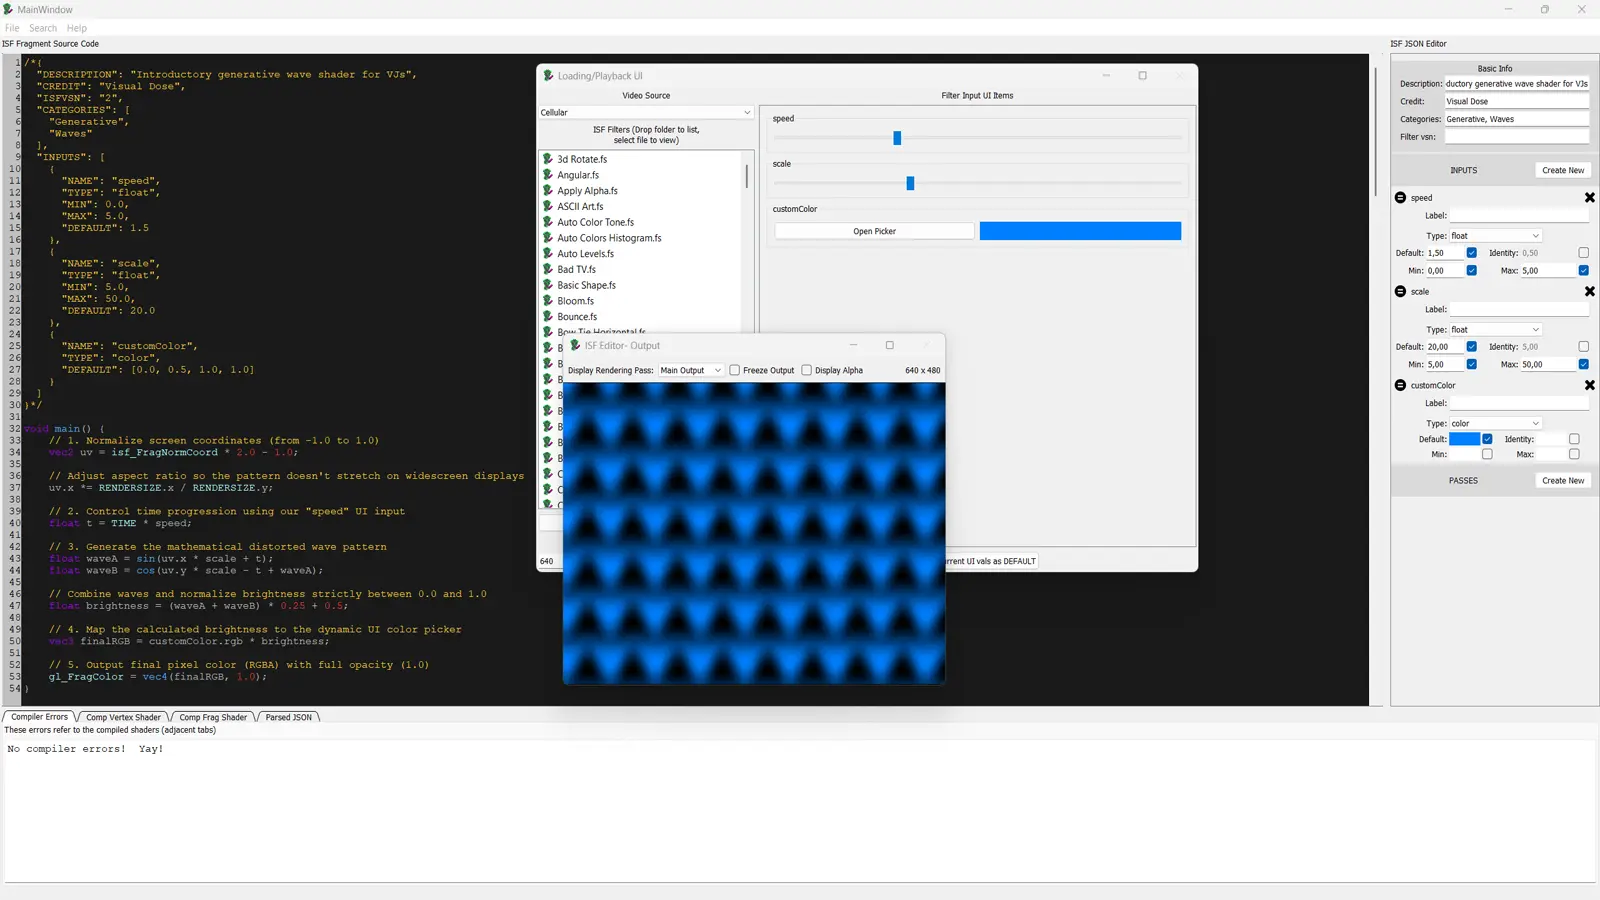
Why tweak the code instead of just the JSON?
Chapter 8 taught you that every JSON input becomes a live control — a slider, a color picker, a toggle. So why would you ever need to touch the GLSL body itself instead of just dragging a slider?
Because not everything inside a shader is exposed as a control. A shader author writes the JSON inputs they personally thought were worth exposing, and stops there. Everything else — the exact ring count, an internal multiplier, a color used only once for a background tint, the formula deciding how fast a shape rotates relative to its size — lives as a fixed, "hard-coded" number directly inside the GLSL code. If you want to change one of those values, the slider for it simply does not exist. You either live with the author's choice forever, or you open the code and change the number yourself.
This is the difference between using a shader and owning it. Once you can confidently make these edits, every shader in your library becomes raw material instead of a finished product, and your visual style stops being limited to what other people decided to expose as a slider.
The safety ladder: three levels of risk
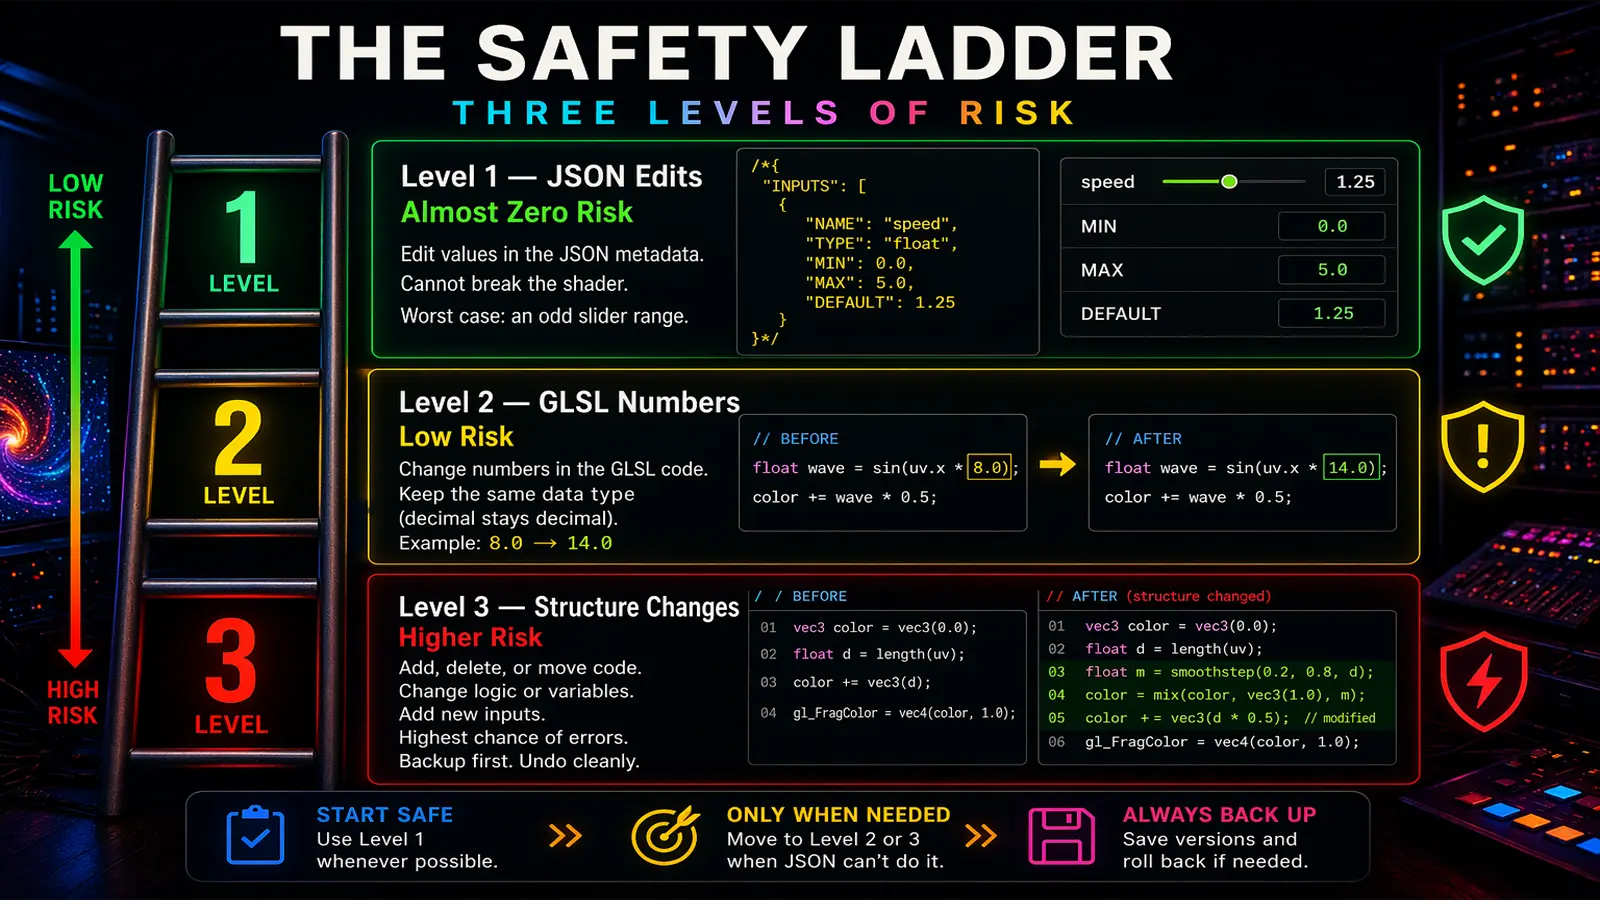
Not all edits carry the same risk. Before changing anything, it helps to know which rung of the ladder you are standing on. We will use this three-level system throughout the chapter, and every tweak below is labeled with its level.
Level 1: JSON-only edits (almost zero risk)
Anything inside the /*{ ... }*/ comment block at the top of the .fs file is JSON metadata, not program logic. Changing a MIN, MAX, or DEFAULT value here cannot introduce a compile error on its own, because the GPU never reads this block as code — ISF reads it separately to build the control panel. The worst outcome of a mistake here is a slider with an odd range; it will never produce a black screen or an error bar.
Level 2: numbers inside the GLSL body (low risk)
Below the JSON block is the actual GLSL program — the part the GPU executes every frame. Changing a plain number here (for example, turning sin(uv.x * 8.0) into sin(uv.x * 14.0)) is low risk as long as you keep the same data type. Remember from Chapter 9: if the original number had a decimal point, your replacement needs one too. 8.0 can safely become 14.0. It cannot safely become 14 in every context, because GLSL is strict about mixing whole numbers with decimals.
Level 3: structure and logic changes (higher risk)
This covers anything that changes how the code is organized: adding a new line, deleting a line, changing which variable feeds into which formula, or adding a brand-new input. These edits are absolutely possible without deep programming knowledge — this chapter walks through several — but they deserve more care, a fresh backup before you start, and a willingness to undo cleanly if the result is not what you expected.
Before you touch anything: make a backup
This is the single most important habit in this entire chapter, more important than any individual tweak. Never edit your only copy of a shader file. A shader you have customized, tuned, and grown to love over months of gigs is not something you want to risk on a careless edit thirty minutes before doors open.
The good news: you do not need to learn Git, command-line tools, or any developer workflow to do this properly. A simple folder system, done consistently, gives you 95% of the protection that professional version control gives a programmer.
The three-folder system for VJs who hate Git
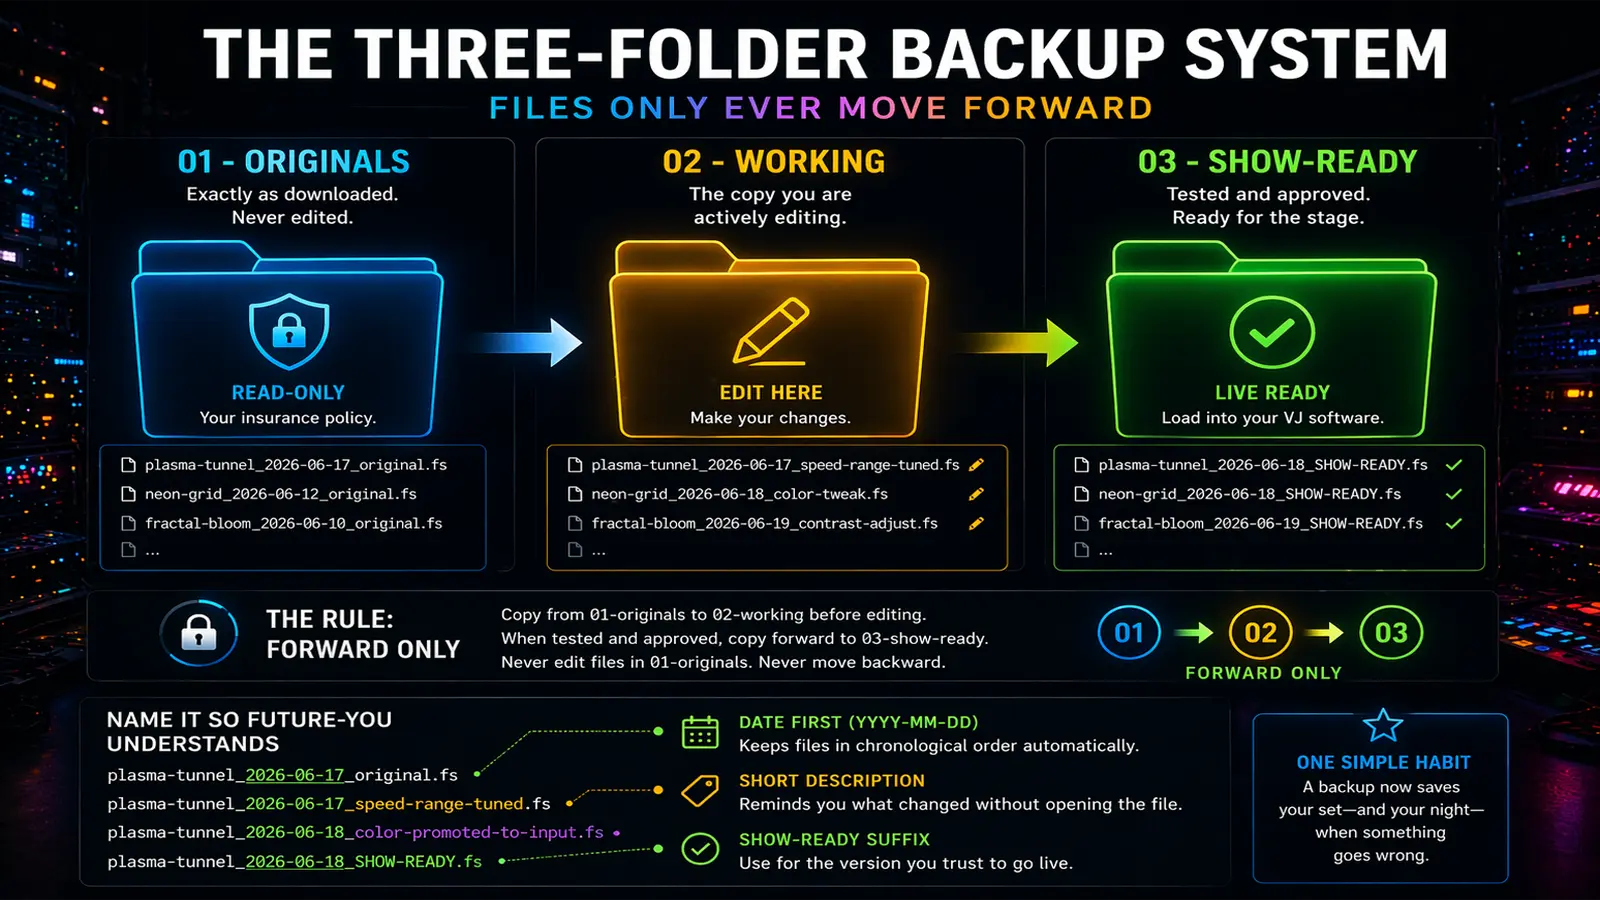
Create three folders inside your shader library, and use them with discipline:
- 01-originals — every shader exactly as you downloaded it, never touched again after the day it lands here. This is your insurance policy.
- 02-working — the copy you are actively editing right now. This is the only file you ever open in a text editor or ISF Editor for modification.
- 03-show-ready — the finished, tested version you actually load into Resolume, VDMX, or Magic Visuals for a performance.
The rule is simple: a file only moves forward, never gets edited backward. You copy from 01-originals into 02-working before touching anything. Once a tweak is tested and you like it, you copy the result into 03-show-ready. 01-originals never changes, ever, for the lifetime of that shader.
Naming your backup files so future-you understands them
A backup is only useful if you can find the right one quickly, ideally while standing at a booth with a crowd waiting. Use a consistent naming pattern that sorts chronologically and describes the change in a few words:
plasma-tunnel_2026-06-17_original.fs
plasma-tunnel_2026-06-17_speed-range-tuned.fs
plasma-tunnel_2026-06-18_color-promoted-to-input.fs
plasma-tunnel_2026-06-18_SHOW-READY.fs
Putting the date first (in YYYY-MM-DD format) makes the folder sort itself in chronological order automatically in Finder, Explorer, or any file browser. Putting a short description after the date means you never have to open a file just to remember what it does. Reserve a clear suffix like SHOW-READY for the version you trust enough to load live.
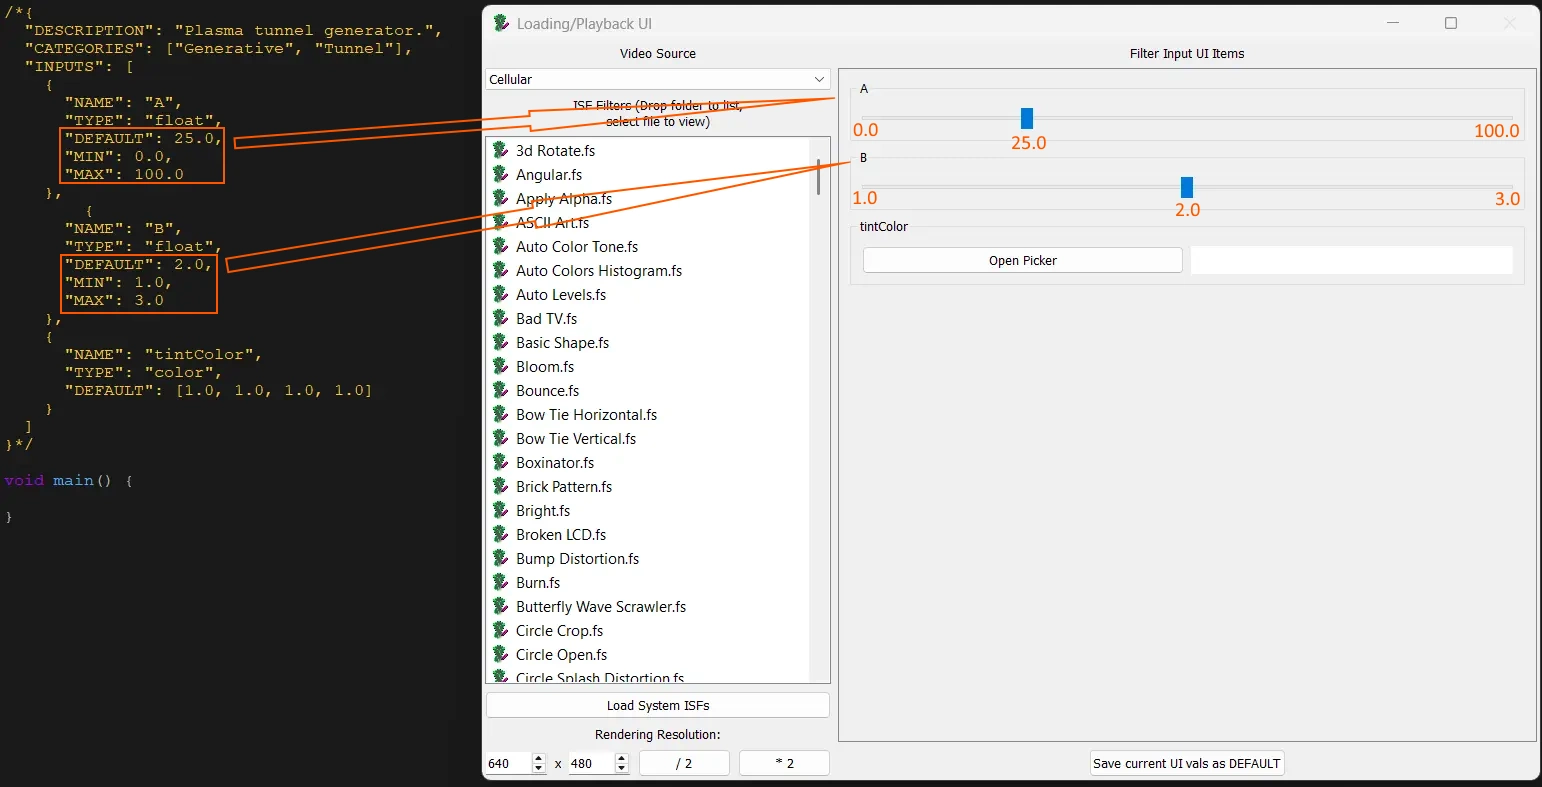
Tweak 1: changing a speed range (MIN and MAX)
Risk level: 1 — JSON only. This is the most common tweak in any VJ's life and the safest possible place to start. Open the .fs file in any plain text editor (Notepad, TextEdit, VS Code, or directly inside ISF Desktop Editor) and look near the top, inside the /*{ ... }*/ comment block, for an entry like this:
{
  "NAME": "speed",
  "TYPE": "float",
  "DEFAULT": 1.0,
  "MIN": 0.0,
  "MAX": 100.0
}
A MAX of 100.0 on a speed slider is a textbook sign of a shader written by someone testing math, not performing live — covered in detail back in Chapter 8. The slider technically goes from 0 to 100, but the entire usable, good-looking range probably lives between 0 and 3. The other 97 units of slider travel are dead space your fingers will never want to touch.
To fix it, simply replace the number after MAX:
{
  "NAME": "speed",
  "TYPE": "float",
  "DEFAULT": 1.0,
  "MIN": 0.0,
  "MAX": 3.0
}
Save the file, reload it in your host or in ISF Editor, and the slider's entire physical travel now maps to the genuinely useful range. The same trick applies to any float input — zoom, blur amount, line thickness, particle count expressed as a decimal — whenever the existing range feels too coarse or too wide for live use.
Guided experiment: retune a speed range
Open any shader in your library that has a speed or rate control. Note the current MIN and MAX. Play the slider across its full range and watch the canvas. Identify the smallest and largest values that still look good to you — write them down. Replace MIN and MAX with those two numbers. Reload the shader. The slider should now feel "full" — every position you drag to should produce something usable on stage.
Tweak 2: changing a DEFAULT uniform value
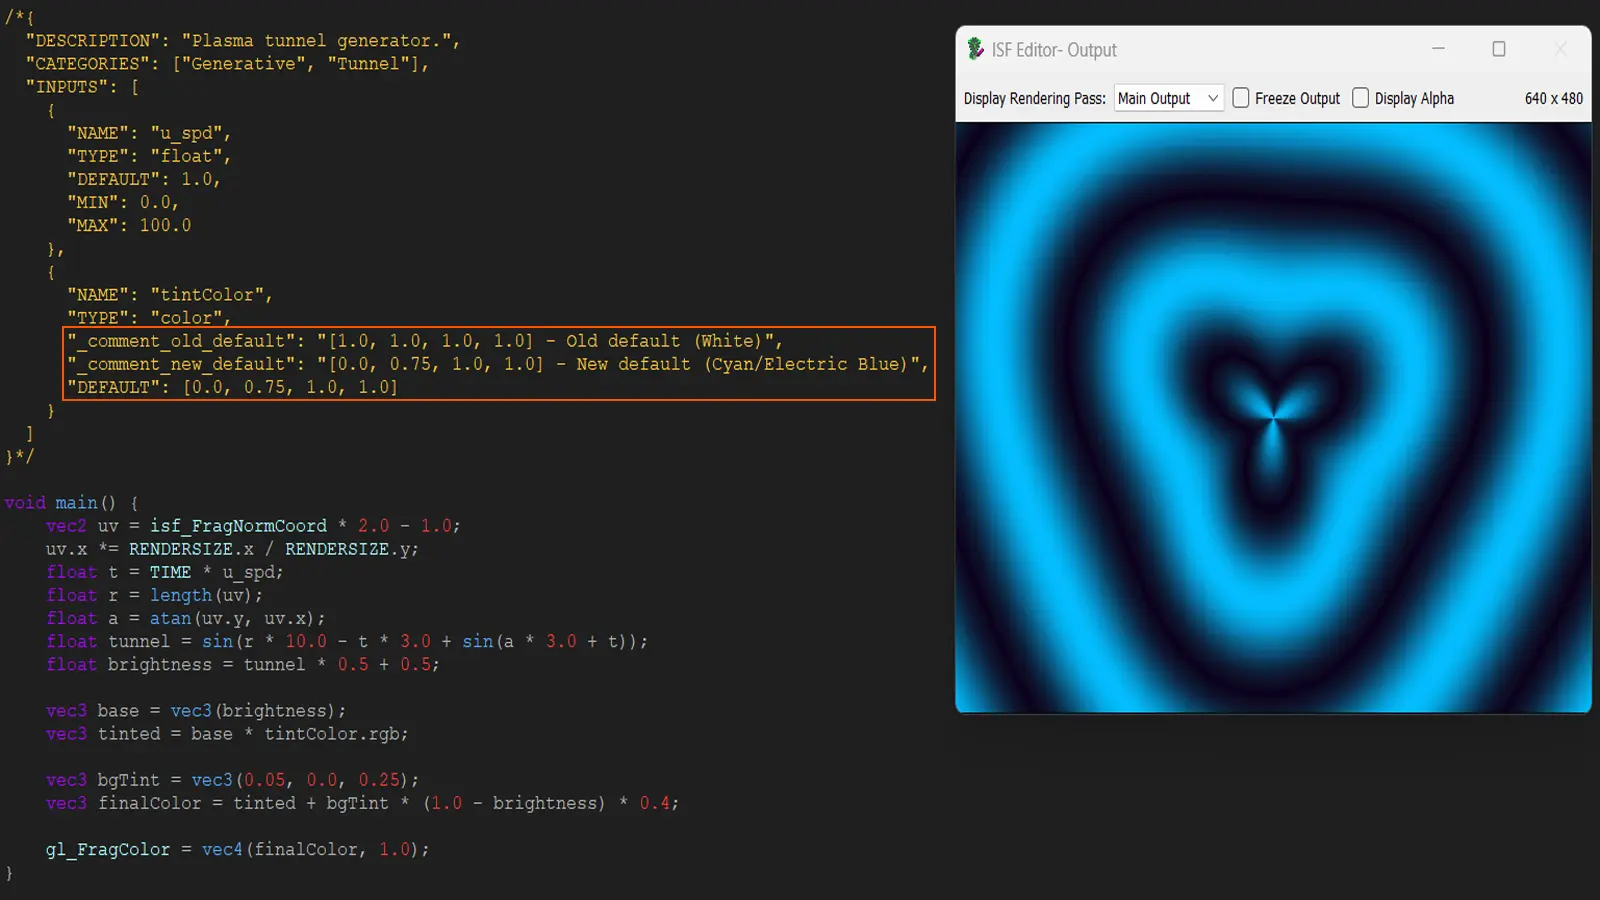
Risk level: 1 — JSON only. Every time you load a shader fresh into your host, every control resets to its DEFAULT value from the JSON block. If a shader always opens with a default speed that is too fast, a default color you never use, or a toggle that defaults to the wrong mode, you can fix that permanently with one small edit, so the shader is born already in the state you want.
{
  "NAME": "tintColor",
  "TYPE": "color",
  "DEFAULT": [0.1, 0.8, 1.0, 1.0]
}
If you find yourself manually dragging the color picker to deep orange every single time you load this shader, that is the signal to change the DEFAULT array instead, so it opens already correct:
{
  "NAME": "tintColor",
  "TYPE": "color",
  "DEFAULT": [1.0, 0.4, 0.05, 1.0]
}
The same applies to a float default speed, a bool default toggle state, or a point2D default focal point. As covered in Chapter 8, a color default must always include all four RGBA values — never drop the alpha (the fourth number), or some hosts will treat the shader as fully transparent on load.
Guided experiment: set a better default
Pick a shader where you always adjust the same control to the same value the moment it loads. Find that input's DEFAULT in the JSON block. Replace it with the value you actually want. Reload the shader fresh (close and reopen it, do not just undo your manual adjustment) and confirm it now opens exactly the way you like it, with zero manual tweaking required.
Tweak 3: finding and changing hard-coded colors
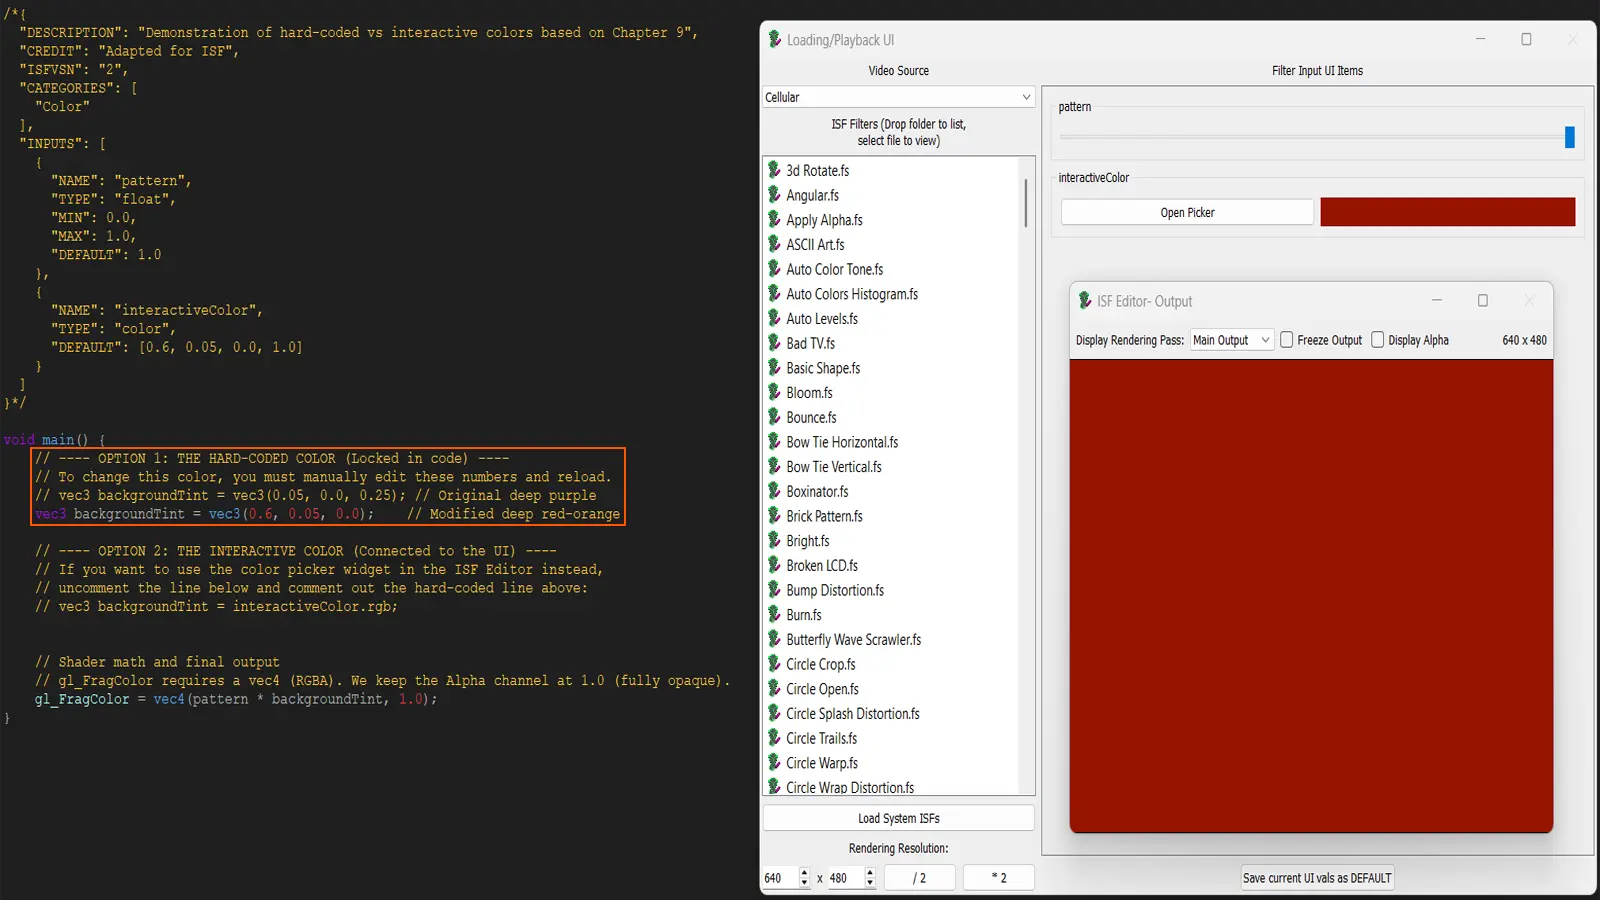
Risk level: 2 — numbers inside the GLSL body. This is the tweak most VJs ask about, because hard-coded colors are the single biggest reason a "perfect except for one color" shader gets abandoned instead of fixed. A hard-coded color is a color value typed directly into the GLSL math, with no JSON input controlling it at all — meaning there is no slider, no color picker, nothing in the UI you can drag. The only way to change it is to edit the number directly in the code.
How to spot a hard-coded color in GLSL
From Chapter 9, you already know that colors in GLSL are written as vec3 (RGB) or vec4 (RGBA), with each channel running from 0.0 to 1.0. A hard-coded color looks like this, sitting directly inside the body of the shader, below the JSON block:
vec3 backgroundTint = vec3(0.05, 0.0, 0.25);
gl_FragColor = vec4(pattern * backgroundTint, 1.0);
That vec3(0.05, 0.0, 0.25) is a deep purple, typed directly into the code with no input controlling it. If you want a different background tint, dragging sliders in your host will never get you there, because no slider exists for it. You have to open the file and change those three numbers directly.
The simplest version of this tweak is to just change the numbers in place:
vec3 backgroundTint = vec3(0.6, 0.05, 0.0);This now produces a deep red-orange instead of purple. Save, reload, done. This is genuinely it — three numbers, each between 0.0 and 1.0, representing red, green, and blue. If you want a color picker to test combinations visually before committing to numbers, any standard online RGB color picker that displays values in the 0–255 range can help: divide each of those numbers by 255 to get the 0.0–1.0 GLSL equivalent. A color showing as RGB (150, 13, 0) becomes vec3(0.59, 0.05, 0.0) in GLSL.
Promoting a hard-coded color to a real control
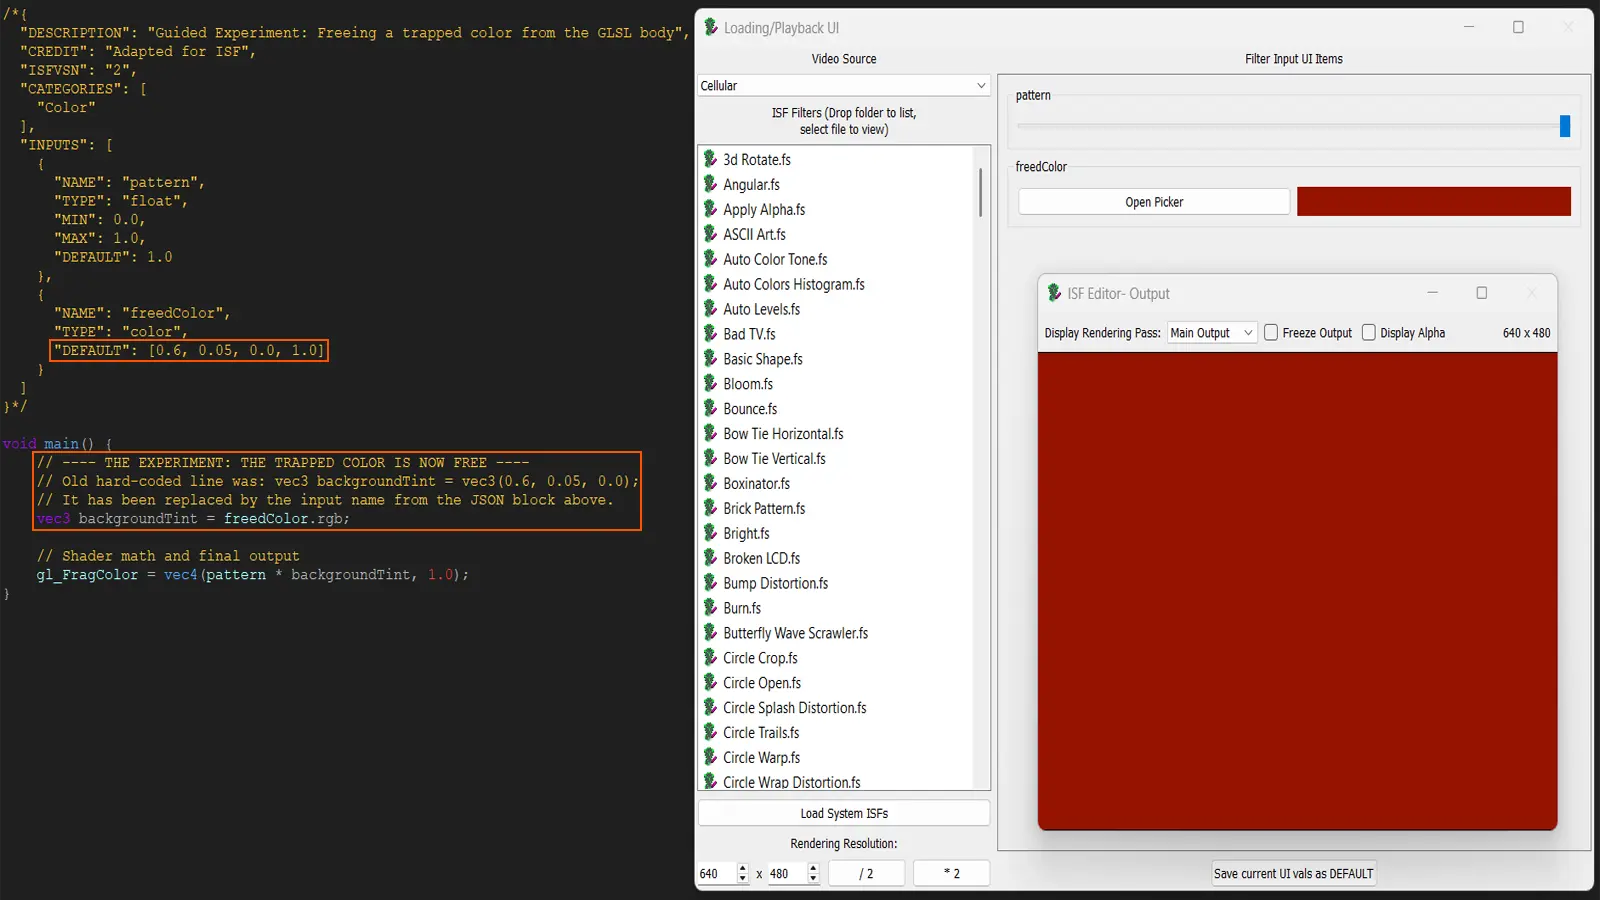
Risk level: 3 — structural change. Editing the number in place fixes the color once. A more powerful version of this tweak turns that trapped color into a real, mappable control you can drag live on stage — exactly the kind of input you authored in Chapter 8. This takes two small steps.
First, add a new color input to the JSON block, using the original hard-coded value as its DEFAULT so nothing changes visually yet:
{
  "NAME": "backgroundTint",
  "TYPE": "color",
  "DEFAULT": [0.05, 0.0, 0.25, 1.0]
}
Second, delete the hard-coded line in the GLSL body and use the new input name directly, remembering that a color input arrives as a vec4, so you need .rgb to get the three-channel version the rest of the formula expects:
// Before:
vec3 backgroundTint = vec3(0.05, 0.0, 0.25);
gl_FragColor = vec4(pattern * backgroundTint, 1.0);

// After:
gl_FragColor = vec4(pattern * backgroundTint.rgb, 1.0);
Notice the variable name backgroundTint is reused on both sides — the local vec3 declaration is removed entirely, and the JSON input of the same name supplies the value automatically as a global, host-injected uniform. This single edit upgrades a permanently fixed color into a live color picker your VJ software exposes immediately, with the original value preserved exactly as the default.
Guided experiment: free a trapped color
Search a shader's GLSL body for any line containing vec3( or vec4( followed directly by three or four plain numbers, not a variable name. That is a hard-coded color (or, in some cases, a hard-coded position or value — the same technique applies). Copy those numbers into a new JSON color input's DEFAULT, replace the hard-coded line with the input name, and reload. Confirm the visual output looks identical immediately after the change — if it is identical, your promotion was successful. Then drag the new color picker and watch your former "trapped" color finally respond live.
Tweak 4: renaming a control without breaking the shader
Risk level: 2 — requires matching two locations. As covered in Chapter 8, performable control names matter: a slider labeled u_k1_mult is unplayable, while one labeled speed is instant. Many community shaders use cryptic internal variable names because the author never expected anyone else to perform with them. You can rename any input, as long as you change it in exactly two places and keep them matching.
{
  "NAME": "u_k1_mult",
  "TYPE": "float",
  "DEFAULT": 1.2,
  "MIN": 0.0,
  "MAX": 4.0
}
That same name appears somewhere in the GLSL body, possibly several times:
float t = TIME * u_k1_mult;To rename it to something performable, change the NAME field in the JSON, then find and replace every appearance of the old name inside the GLSL body with the new one — the names must match exactly, including capitalization:
{
  "NAME": "speed",
  "TYPE": "float",
  "DEFAULT": 1.2,
  "MIN": 0.0,
  "MAX": 4.0
}
float t = TIME * speed;Most text editors have a "find and replace" feature (usually Ctrl+H or Cmd+H) that makes this safe even if the old name appears five or six times throughout the file — type the old name, type the new name, click "replace all," and every instance updates together so nothing gets missed.
Guided experiment: rename for the stage
Find a shader in your library with at least one cryptic input name. Decide on a short, plain-English replacement under twelve characters, following the naming guidance from Chapter 8. Use find-and-replace to update every occurrence in the GLSL body, then update the NAME field in the JSON block to match. Reload the shader and confirm the control now appears in your host's UI with the new, readable label, and that it still controls exactly the same thing as before.
Full before-and-after shader walkthrough
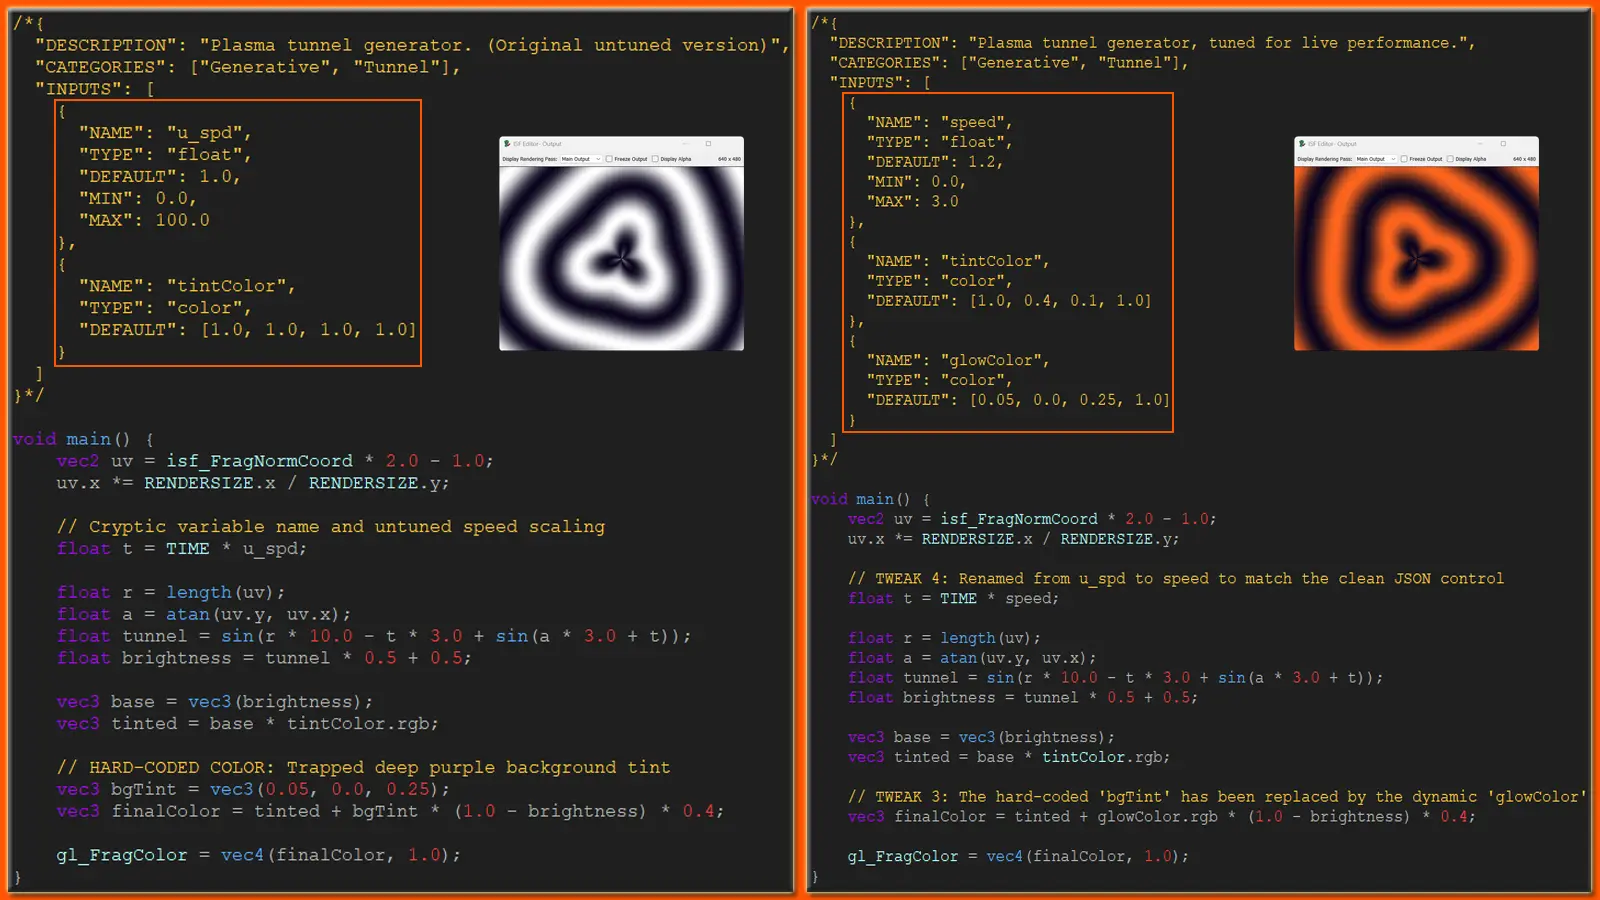
Let's apply every tweak from this chapter to one real shader, start to finish. We will use the plasma tunnel pattern introduced in Chapter 8, written here the way a typical downloaded shader might arrive: a usable but untuned speed range, a hard-coded background tint with no control, and a cryptic internal variable name.
The original downloaded shader
/*{
  "DESCRIPTION": "Plasma tunnel generator.",
  "CATEGORIES": ["Generative", "Tunnel"],
  "INPUTS": [
    {
      "NAME": "u_spd",
      "TYPE": "float",
      "DEFAULT": 1.0,
      "MIN": 0.0,
      "MAX": 100.0
    },
    {
      "NAME": "tintColor",
      "TYPE": "color",
      "DEFAULT": [1.0, 1.0, 1.0, 1.0]
    }
  ]
}*/

void main() {
    vec2 uv = isf_FragNormCoord * 2.0 - 1.0;
    uv.x *= RENDERSIZE.x / RENDERSIZE.y;
    float t = TIME * u_spd;
    float r = length(uv);
    float a = atan(uv.y, uv.x);
    float tunnel = sin(r * 10.0 - t * 3.0 + sin(a * 3.0 + t));
    float brightness = tunnel * 0.5 + 0.5;

    vec3 base = vec3(brightness);
    vec3 tinted = base * tintColor.rgb;

    vec3 bgTint = vec3(0.05, 0.0, 0.25);
    vec3 finalColor = tinted + bgTint * (1.0 - brightness) * 0.4;

    gl_FragColor = vec4(finalColor, 1.0);
}
Three real problems here, all common in downloaded shaders: the speed slider goes 0–100 with the useful zone hiding in the first 3 units (Tweak 1); the deep purple background glow in bgTint is hard-coded with zero control (Tweak 3); and the speed input is named u_spd, which is unreadable on stage (Tweak 4).
The tweaked, performance-ready shader
/*{
  "DESCRIPTION": "Plasma tunnel generator, tuned for live performance.",
  "CATEGORIES": ["Generative", "Tunnel"],
  "INPUTS": [
    {
      "NAME": "speed",
      "TYPE": "float",
      "DEFAULT": 1.2,
      "MIN": 0.0,
      "MAX": 3.0
    },
    {
      "NAME": "tintColor",
      "TYPE": "color",
      "DEFAULT": [1.0, 0.4, 0.1, 1.0]
    },
    {
      "NAME": "glowColor",
      "TYPE": "color",
      "DEFAULT": [0.05, 0.0, 0.25, 1.0]
    }
  ]
}*/

void main() {
    vec2 uv = isf_FragNormCoord * 2.0 - 1.0;
    uv.x *= RENDERSIZE.x / RENDERSIZE.y;
    float t = TIME * speed;
    float r = length(uv);
    float a = atan(uv.y, uv.x);
    float tunnel = sin(r * 10.0 - t * 3.0 + sin(a * 3.0 + t));
    float brightness = tunnel * 0.5 + 0.5;

    vec3 base = vec3(brightness);
    vec3 tinted = base * tintColor.rgb;

    vec3 finalColor = tinted + glowColor.rgb * (1.0 - brightness) * 0.4;

    gl_FragColor = vec4(finalColor, 1.0);
}
Every change here maps directly to a tweak covered above: u_spd became speed (Tweak 4), MAX dropped from 100.0 to 3.0 and DEFAULT moved to a more central 1.2 (Tweaks 1 and 2), and the hard-coded bgTint became a fully draggable glowColor input (Tweak 3). Nothing about the underlying math changed — the visual logic is identical. Only the controls around it became performable.
Live shader preview: Neon Pulse Rings after GLSL tweaks
The demo below runs a tuned generative shader — concentric neon rings with the same three control types you built in the walkthrough: a tightened speed range (0–3), a live ring tint, and a promoted glow color. Drag every control and feel the difference between owning a shader and merely loading one.
Speed · TINTCOLOR · GLOWCOLOR — tuned live controls after GLSL tweaks
Tuned version — speed maps to a useful range, and both tint and glow colors are live pickers instead of numbers trapped in the code.
Version control for VJs without touching Git
"Version control" sounds like a programmer's word, but the concept is something every VJ already understands instinctively: keep a history of states you can return to. The three-folder system from earlier in this chapter is already a working version of it. This section adds the habits that make it bulletproof, plus an honest look at the real tool — Git — for anyone who wants to go further.
The "known good" rule
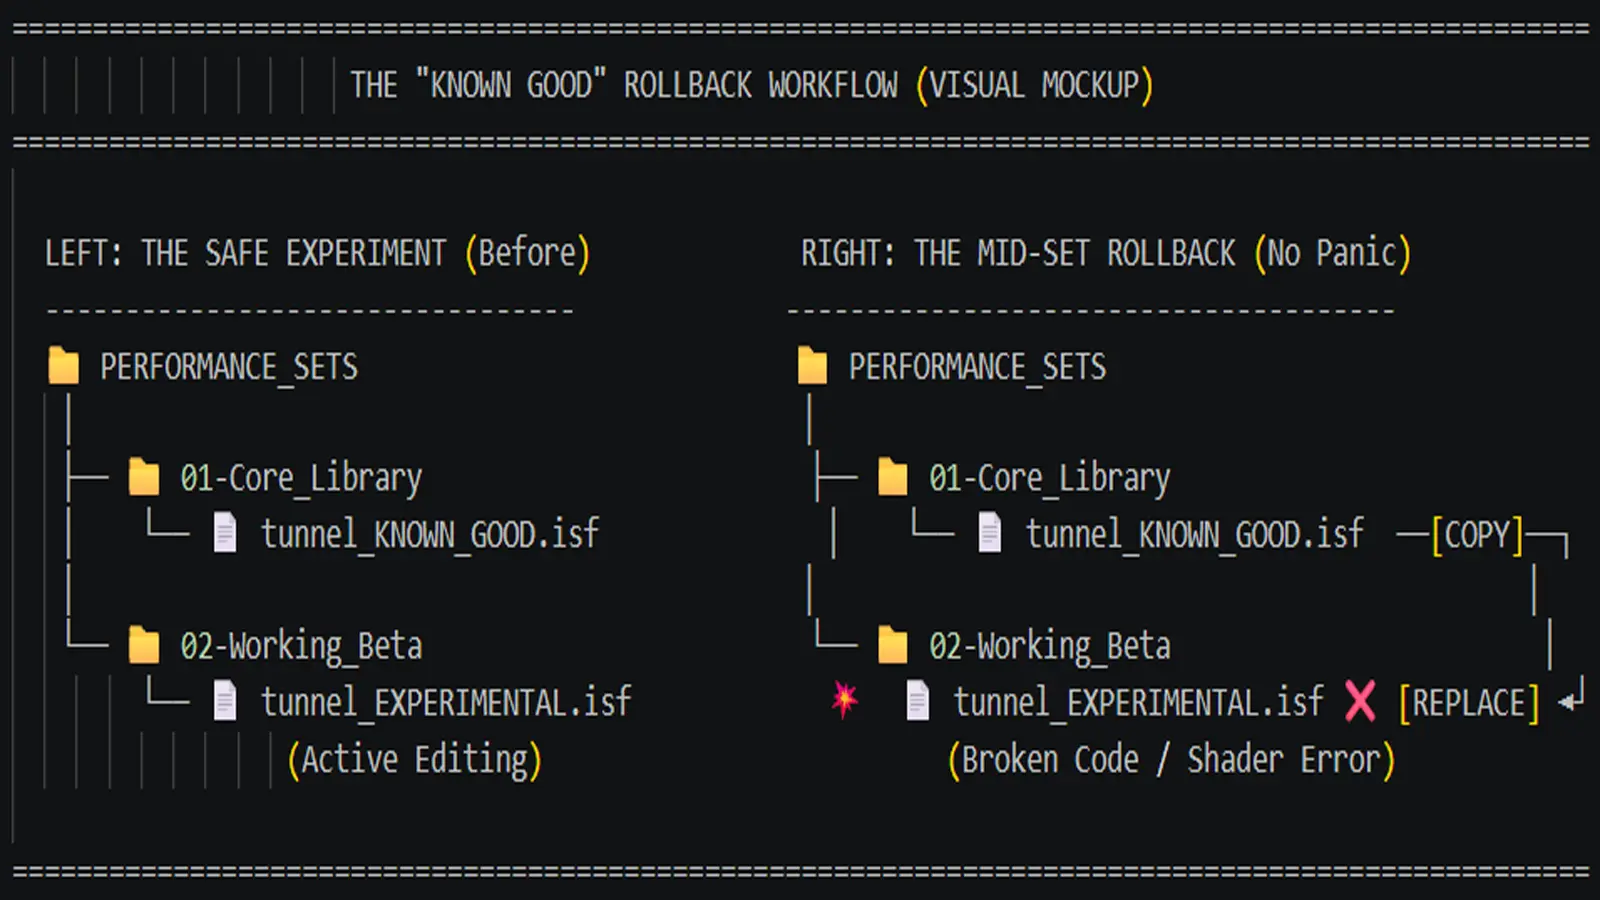
Before a gig, every shader you plan to use should have one file you mentally label as "known good" — a version you have tested, that you trust completely, that has never let you down. Never overwrite that file directly. When you want to try a new tweak, duplicate it first, edit the duplicate, and only replace the "known good" version once the new one has proven itself across at least one full rehearsal or low-stakes set.
This single habit prevents the worst possible scenario: opening your laptop at a venue, loading what you think is your trusted shader, and discovering mid-tweak edits that were never finished or tested.
How to roll back after a bad tweak mid-set
If you are editing live (which most experienced VJs eventually do, tweaking shaders between sets or during soundcheck) and a change breaks something, the fastest recovery is always the same: close the file without saving if you have not saved yet, or copy your 02-working backup back over the broken file if you have already saved a bad version. This is exactly why the three-folder system matters — there is always a known-safe copy one folder away, and "roll back" becomes a simple copy-paste instead of a panic.
Most text editors also keep their own undo history (Ctrl+Z / Cmd+Z) for the current editing session, which can recover recent changes even before you reach for a backup file — but undo history disappears the moment you close the file, while a backup folder does not. Treat undo as a quick first try, and your backup folder as the real safety net.
Optional: real version control with Git
If you eventually want more than folders and file names — full history of every change, the ability to compare any two versions line by line, and the ability to "branch" into an experimental version without risking your main one — that tool is called Git, paired with a free account on GitHub or GitLab. This is genuinely optional — most working VJs run their entire careers on disciplined folders and file names, and there is no shame in staying there. But if your shader library grows into the hundreds of files and you start collaborating with other VJs on shared patches, Git's free desktop apps (like GitHub Desktop) provide a visual, no-command-line way to get those benefits without learning to type Git commands.
Common mistakes that break a downloaded shader
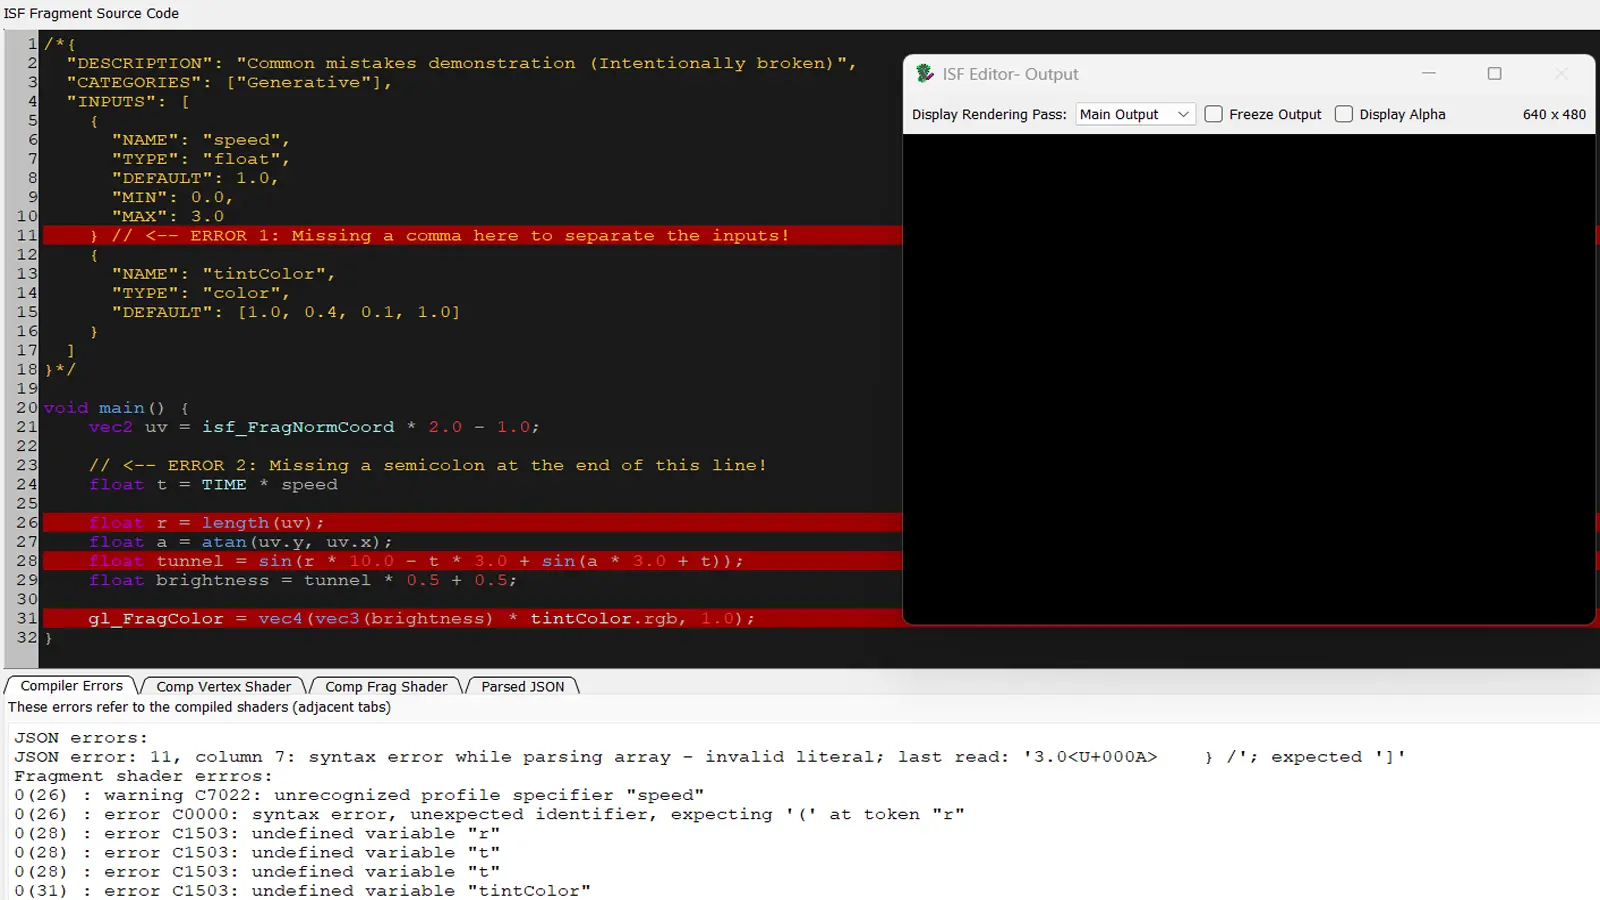
These are the errors that account for the overwhelming majority of "I tweaked one number and now it's all black" messages in VJ communities. Knowing them in advance saves hours of confused troubleshooting.
- Removing a closing brace or parenthesis. Every
{needs a matching}, and every(needs a matching). If you delete a whole line while editing, make sure you did not also delete half of a pair that closes somewhere else. - Forgetting a semicolon. Almost every line of GLSL code ends with
;. If you add a new line of code by copying an existing one and changing the values, make sure the semicolon came along with it. - Breaking the JSON with a missing comma. Every input in the
INPUTSarray except the very last one needs a comma after its closing}. Adding a new input without a comma before it is the single most common JSON mistake. - Mixing types incorrectly, covered fully in Chapter 9 — typing a whole number like
2where a decimal like2.0is expected in float math. - Renaming only one of the two required spots. Tweak 4 above requires the JSON
NAMEand every GLSL usage to match exactly. Renaming only one side leaves the shader referencing a variable that no longer exists.
If any of these happen, your host or ISF Editor will usually show a red error bar with a line number — that line number is genuinely useful information, not something to be afraid of. Go directly to that line, compare it carefully against your backup copy, and look specifically for a missing bracket, comma, or semicolon near it.
Quick reference: what to touch, what to leave alone
| What you want to change | Where to look | Risk level |
|---|---|---|
| Slider feels too wide or too narrow | MIN / MAX in the JSON block |
1 — JSON only |
| Shader opens in the wrong state every time | DEFAULT in the JSON block |
1 — JSON only |
| A color you cannot drag anywhere in the UI | Search GLSL body for vec3( / vec4( with plain numbers |
2 — GLSL number edit |
| A control labeled with a cryptic name | NAME in JSON + matching GLSL variable |
2 — must match in two places |
| The overall pattern shape, ring count, geometry | The math formulas inside main() |
3 — structural, test carefully |
| Adding a brand-new control | New entry in INPUTS array + new GLSL usage |
3 — structural, test carefully |
Frequently Asked Questions
What comes next
You can now confidently open a downloaded shader and change exactly what you want to change — speed ranges, default values, hard-coded colors, and control names — with a safety net in place to roll back any tweak that does not work out. The next chapter — ISF Filters vs. ISF Generators — Chapter 11 — shifts from editing individual shaders to thinking about your whole visual chain: when to stack ISF filters as post-FX on top of SDI or NDI camera feeds, and when a generator should drive the master layer directly in a Resolume-style deck.
Technical Appendix
This appendix centralizes quick references for this chapter, including cited links and chapter navigation for faster study and review.

Referenced Links
- Chapter 1
- Chapter 7
- Chapter 8
- Chapter 9
- ISF for VJs manual index
- the ISF library
- editor.isf.video
- ISF Editor
- ISF Desktop Editor
- Git
- GitHub
- GitLab
- GitHub Desktop